 Koa源码阅读
# Koa2源码阅读
本文通过和官方文档 (opens new window)的结合,逐步解析解析Koa源码,最后再实现一个自己的Koa进行巩固。
Koa源码十分简单,我们查看目录结构可看到,核心的文件只有4个。
koa
├── AUTHORS
├── benchmarks
├── CODE_OF_CONDUCT.md
├── docs
├── History.md
├── lib
│   ├── application.js
│   ├── context.js
│   ├── request.js
│   └── response.js
├── LICENSE
├── package.json
├── Readme.md
└── test
application.jsKoa的入口文件,封装了context、request、response以及核心的中间件处理流程。context.js处理应用的上下文request.js处理http请求response.js处理http响应
# 源码解析
# Introduction
Koa is a new web framework designed by the team behind Express, which aims to be a smaller, more expressive, and more robust foundation for web applications and APIs. By leveraging async functions, Koa allows you to ditch callbacks and greatly increase error-handling. Koa does not bundle any middleware within its core, and it provides an elegant suite of methods that make writing servers fast and enjoyable.
我们首先看一个使用koa应用时,项目的入口文件大概的例子:
const path = require('path')
const Koa = require('koa')
const views = require('koa-views')
const koaStatic = require('koa-static')
const bodyParser = require('koa-bodyparser')
const koaLogger = require('koa-logger')
const session = require('koa-session-minimal')
const MysqlStore = require('koa-mysql-session')

const config = require('./../config')
const routers = require('./routers/index')

const app = new Koa()

// session存储配置
const sessionMysqlConfig= {
  user: config.database.USERNAME,
  password: config.database.PASSWORD,
  database: config.database.DATABASE,
  host: config.database.HOST,
}

// 配置session中间件
app.use(session({
  key: 'USER_SID',
  store: new MysqlStore(sessionMysqlConfig)
}))

// 配置控制台日志中间件
app.use(koaLogger())

// 配置ctx.body解析中间件
app.use(bodyParser())

// 配置静态资源加载中间件
app.use(koaStatic(
  path.join(__dirname , './../static')
))

// 配置服务端模板渲染引擎中间件
app.use(views(path.join(__dirname, './views'), {
  extension: 'ejs'
}))

// 初始化路由中间件
app.use(routers.routes()).use(routers.allowedMethods())

// 监听启动端口
app.listen( config.port )
console.log(`the server is start at port ${config.port}`)
使用过Koa的我们都知道,当我们需要某一个功能时,会使用app.use将这一功能加载到Koa应用中,这一个要加载的功能就是中间件。正如上面的例子,配置session中间件、配置控制台日志中间件、配置ctx.body解析中间件等等。
对于业务层的开发者而言,只需要我们根据业务需求,简单地引入相应的中间件,那么Koa就会帮助我们加载并处理相应的业务内容。
在Koa中,我们的代码都是以中间件的形式加载运行,正式因为中间件的存在,我们的代码逻辑会十分的清晰。
那么Koa是如何做到的,下面我们就通过源码进行分析。
# Application
A Koa application is an object containing an array of middleware functions which are composed and executed in a stack-like manner upon request.
Koa 应用程序是一个包含一组中间件函数的对象,它是按照类似堆栈的方式组织和执行的。
application.js是对这句话的实现。
# require
/**
 * Module dependencies.
 */

const isGeneratorFunction = require('is-generator-function');
const debug = require('debug')('koa:application');
const onFinished = require('on-finished');
const response = require('./response');
const compose = require('koa-compose');
const context = require('./context');
const request = require('./request');
const statuses = require('statuses');
const Emitter = require('events');
const util = require('util');
const Stream = require('stream');
const http = require('http');
const only = require('only');
const convert = require('koa-convert');
const deprecate = require('depd')('koa');
const { HttpError } = require('http-errors');
require('http');Koa使用Node的工具库http来创建http服务,对Node的http库进行了一层封装。- statuses (opens new window) HTTP status utility for node.
# constructor
module.exports = class Application extends Emitter {

  /**
    *
    * @param {object} [options] Application options
    * @param {string} [options.env='development'] Environment
    * @param {string[]} [options.keys] Signed cookie keys
    * @param {boolean} [options.proxy] Trust proxy headers
    * @param {number} [options.subdomainOffset] Subdomain offset
    * @param {boolean} [options.proxyIpHeader] proxy ip header, default to X-Forwarded-For
    * @param {boolean} [options.maxIpsCount] max ips read from proxy ip header, default to 0 (means infinity)
    *
    */
  constructor(options) {
    super();
    options = options || {};
    this.proxy = options.proxy || false;
    this.subdomainOffset = options.subdomainOffset || 2;
    this.proxyIpHeader = options.proxyIpHeader || 'X-Forwarded-For';
    this.maxIpsCount = options.maxIpsCount || 0;
    this.env = options.env || process.env.NODE_ENV || 'development';
    if (options.keys) this.keys = options.keys;
    this.middleware = [];
    this.context = Object.create(context);
    this.request = Object.create(request);
    this.response = Object.create(response);
    // util.inspect.custom support for node 6+
    /* istanbul ignore else */
    if (util.inspect.custom) {
      this[util.inspect.custom] = this.inspect;
    }
  }

  ...
}
这里构造函数主要目的是做配置,有两个点需要注意:
官方文档中涉及到的Settings (opens new window)和app.keys= (opens new window)
app.env默认是 NODE_ENV 或 "development"app.keys签名的 cookie 密钥数组app.proxy当真正的代理头字段将被信任时- 忽略
.subdomains的app.subdomainOffset偏移量,默认为 2 app.proxyIpHeader代理 ip 消息头, 默认为X-Forwarded-Forapp.maxIpsCount从代理 ip 消息头读取的最大 ips, 默认为 0 (代表无限)
初始化中间件、上下文、请求、响应
this.middleware = [];数组初始化koa实例中初始化导入的
context、request、response,分别对应koa中的其余三个文件。Object.create的目的是创建新的对象,避免指向同一引用。this.context = Object.create(context); this.request = Object.create(request); this.response = Object.create(response);
声明自定义检查函数,详见下面
app.inspecthttp://nodejs.cn/api/util.html#util_util_inspect_custom
if (util.inspect.custom) { this[util.inspect.custom] = this.inspect; }
# listen
/**
* Shorthand for:
*
* http.createServer(app.callback()).listen(...)
*
* @param {Mixed} ...
* @return {Server}
* @api public
*/
listen(...args) {
debug('listen');
const server = http.createServer(this.callback());
return server.listen(...args);
}
这里其实是http.createServer(app.callback()).listen(...)的语法糖。这里会直接传入this.callback(),并创建http服务。
详见官方文档app.listen (opens new window)
# inspect
/**
* Return JSON representation.
* We only bother showing settings.
*
* @return {Object}
* @api public
*/
toJSON() {
return only(this, [
'subdomainOffset',
'proxy',
'env'
]);
}
/**
* Inspect implementation.
*
* @return {Object}
* @api public
*/
inspect() {
return this.toJSON();
}
- only (opens new window) Return whitelisted properties of an object.
- 这里返回的object只会包含
subdomainOffset、proxy和env
- 这里返回的object只会包含
inspect() {...}这里是对构造函数中引用的inspect的实现。
# use
/**
* Use the given middleware `fn`.
*
* Old-style middleware will be converted.
*
* @param {Function} fn
* @return {Application} self
* @api public
*/
use(fn) {
if (typeof fn !== 'function') throw new TypeError('middleware must be a function!');
if (isGeneratorFunction(fn)) {
deprecate('Support for generators will be removed in v3. ' +
'See the documentation for examples of how to convert old middleware ' +
'https://github.com/koajs/koa/blob/master/docs/migration.md');
fn = convert(fn);
}
debug('use %s', fn._name || fn.name || '-');
this.middleware.push(fn);
return this;
}
这里主要做一件事,就是将app.use方法包裹的函数放入中间件数组中,即将给定的中间件方法添加到此应用程序。
流程如下:
- 首先判断fn是否是函数;
- 判断fn是否是generator函数,如果是,就使用
koa-convert将其转换成async/await函数。koa1是使用generator实现的,koa2使用async/await实现; - 将fn放入middleware数组;
- 返回this,实现链式调用;
详见官方文档app.use (opens new window)
# callback
/**
* Return a request handler callback
* for node's native http server.
*
* @return {Function}
* @api public
*/
callback() {
const fn = compose(this.middleware);
if (!this.listenerCount('error')) this.on('error', this.onerror);
const handleRequest = (req, res) => {
const ctx = this.createContext(req, res);
return this.handleRequest(ctx, fn);
};
return handleRequest;
}
官方文档app.callback (opens new window)对此方法介绍非常简单,返回适用于 http.createServer() 方法的回调函数来处理请求。你也可以使用此回调函数将 koa 应用程序挂载到 Connect/Express 应用程序中。
流程如下:
- 使用compose函数处理中间件,返回一个新的函数。这里就是Koa处理中间件的核心,Koa中间件的洋葱模型。
- 判断app上错误监听的数量,也就是判断是否我们的代码里有自己写监听,如果没有那么走Koa的
this.onerror方法。如果有就走我们自定义的错误处理。详见[Error Handling](Error Handling) - 创建内部函数
handleRequestthis.createContext(req, res)创建新的上下文context,也就是每次请求,都会创建全局唯一的context- 调用
this.handleRequest方法并返回,详见对应解析段落 - 返回
handleRequest函数作为http.createServer()方法的回调函数使用
这里的关键点是Koa的洋葱模型,也就是Koa实现中间件的机制,一个中间件有两个切面,遵循先进后出的切面执行顺序,类似入栈出栈的顺序。
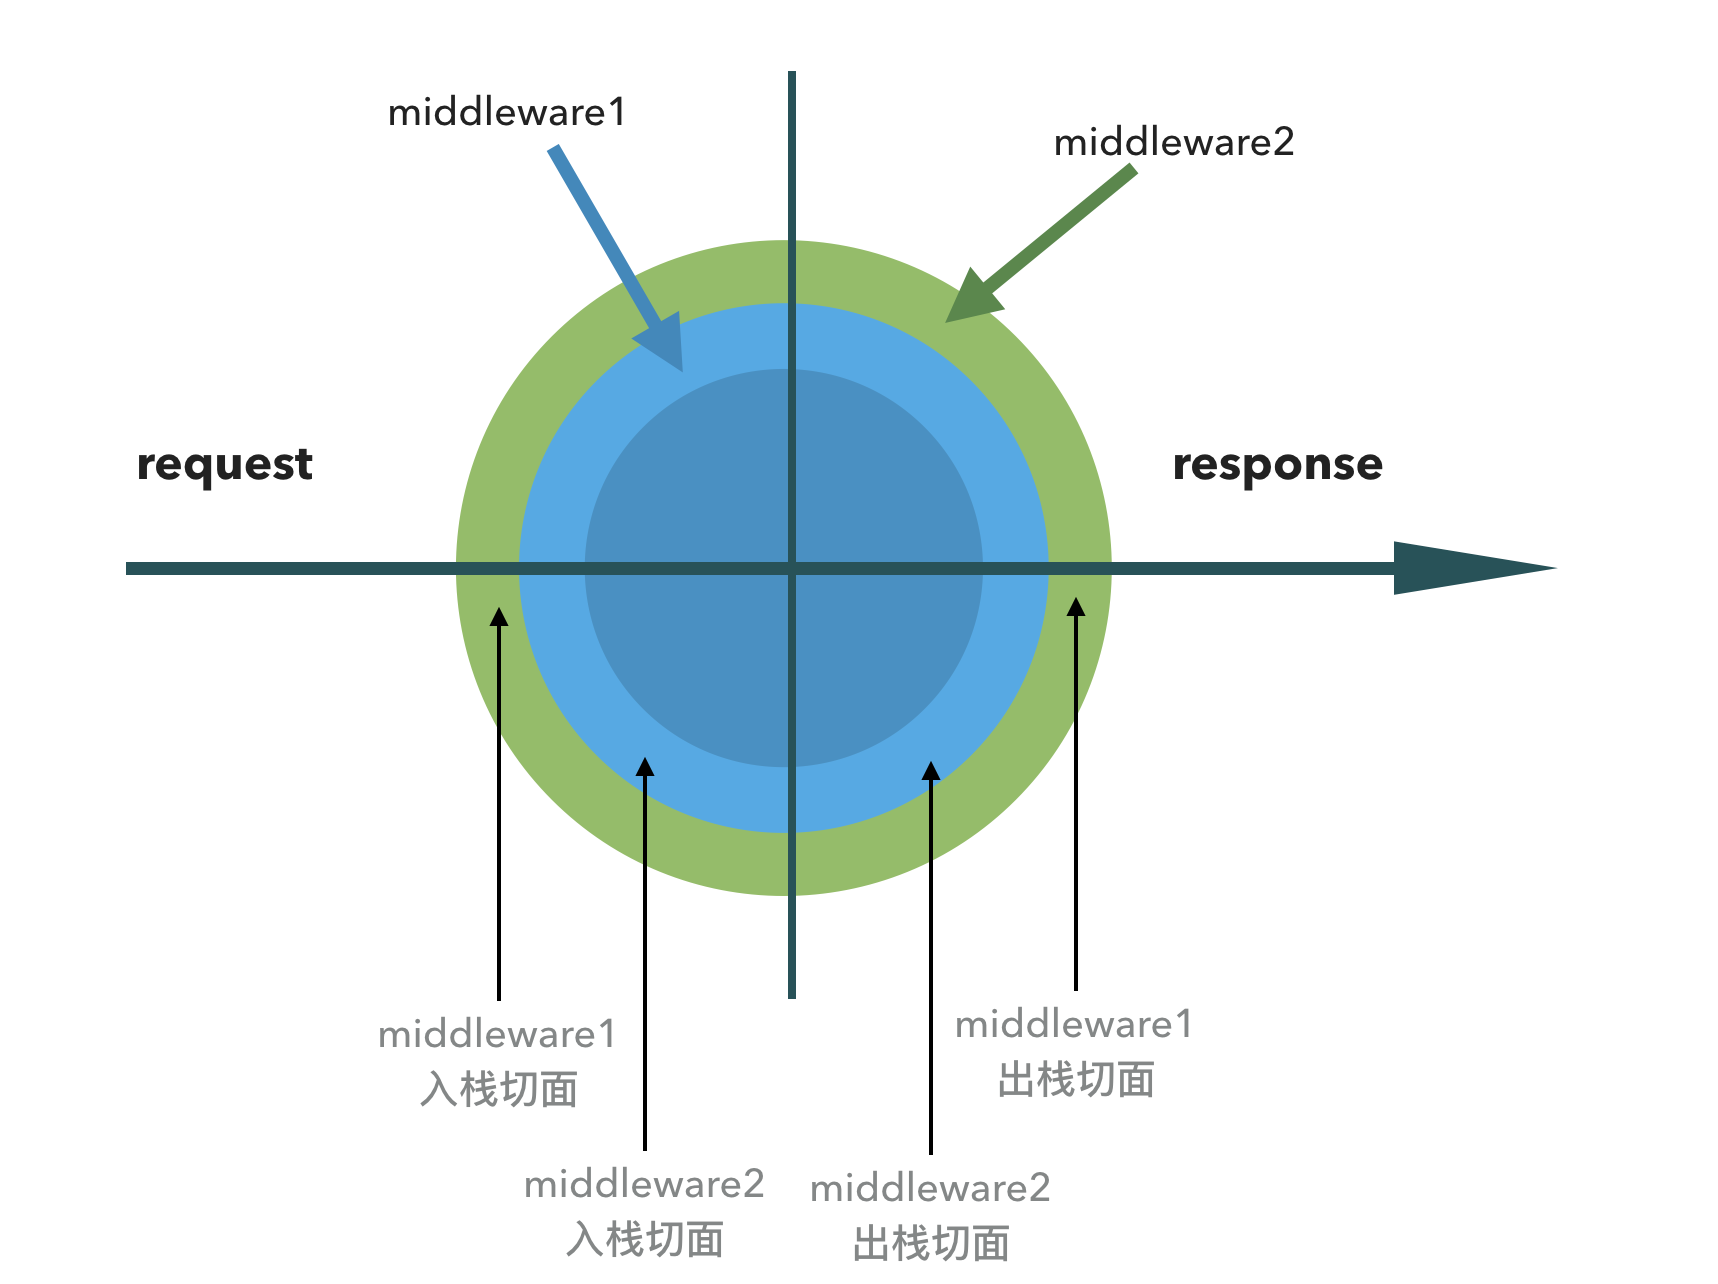 官方文档Cascading (opens new window)举例也是如此,在官方文档指南 (opens new window)中有这样一张图对此例子的执行流程进行了演示。
我们可以发现,以await next()为分界点,会按照代码书写顺序依次执行,然后在代码顺序执行完毕之后,会逐级向上执行之后的代码。
中间件的在 await next() 前后的操作,很像数据结构的一种场景——“栈”,先进后出。同时,又有统一上下文管理操作数据。
这里的执行顺序,就是koa-compose (opens new window)做的事情。我们可以看下它的源码:
'use strict'
module.exports = compose
function compose (middleware) {
if (!Array.isArray(middleware)) throw new TypeError('Middleware stack must be an array!')
for (const fn of middleware) {
if (typeof fn !== 'function') throw new TypeError('Middleware must be composed of functions!')
}
return function (context, next) {
// last called middleware #
let index = -1
return dispatch(0)
function dispatch (i) {
if (i <= index) return Promise.reject(new Error('next() called multiple times'))
index = i // 更新index 避免同一中间件多次调用
let fn = middleware[i] // app.use 注册的中间件,从第一个开始
if (i === middleware.length) fn = next // 中间件执行完,取最外层传入的next函数
if (!fn) return Promise.resolve() // fn为undefined就直接resovle
try {
return Promise.resolve(fn(context, dispatch.bind(null, i + 1))) // resolve 递归调用dipatch成栈
} catch (err) {
return Promise.reject(err)
}
}
}
}
函数执行流程如下:
middleware必须是数组
middleware中的元素必须是函数
返回一个函数
function (context, next) {...}此函数内部定义一个
dispatch()函数调用
dispatch()函数并传入0dispatch调用后我们获取到第一个中间件,使用Promise.resovle()包裹fn的执行结果,fn就是我们的中间件,在此处就会执行调用我们注册的中间件await next()前的内容,再将Promise结果返回。fn的第二个参数会递归调用dispatch,生成我们第一个中间件的
next函数。递归执行,最终嵌套生成类似如下格式的代码,这个代码在调用
compose(middleware)之后再次调用获取到compose(middleware)(ctx)。结果就是嵌套起来执行的中间件。Promise.resolve(fn1(context, async () => { return Promise.resolve(fn2(context, async () => { return Promise.resolve(fn3(context, async () => { return Promise.resolve(); })); })); }));这样最外层的Promise状态取决于
fn1中的next何时执行完毕,fn1中next的Promise取决于fn2中的next何时执行完毕,就这样层层嵌套,外层的中间件何时执行依赖于内层的中间件何时完成执行。所以当最内层
fn3获取到next执行完return Promise.resolve();后,就会出现最内层到最外层的Promise一层层地pending状态转换成完成态。这就是洋葱模型的实现机制。
在中间件自身,我们使用async函数,这样可以让异步转同步更方便,但是,**async并不是koa洋葱模型的必要条件。**可以在next之后同步再执行其它内容,那么这个中间件就会从上至下顺序执行,并不会按照上述流程执行。
但是,当开发者在一个组件中多次调用next方法,koa会如何处理呢?
- 首先声明
index = -1 - 在每个中间件的
next函数内部判断这个i是否小于等于现在中间件的index,然后更新这个index为i。 这时如果多次调用next,i就会大于等于现在的index,抛出错误next() called multiple times
# handleRequest
/**
* Handle request in callback.
*
* @api private
*/
handleRequest(ctx, fnMiddleware) {
const res = ctx.res;
res.statusCode = 404;
const onerror = err => ctx.onerror(err);
const handleResponse = () => respond(ctx);
onFinished(res, onerror);
return fnMiddleware(ctx).then(handleResponse).catch(onerror);
}
这里的fnMiddleware就是compose()函数的返回值。
这个函数的目的就是处理请求。
流程如下:
- 调用
fnMiddleware(ctx)执行所有的中间件,并将执行结果交给handleResponse处理。错误交给onerror处理。
每一个请求,就会走一个这样的流程处理流程,这也就是我们发起一个http请求时,所有中间件都能按照顺序执行的原理。
这里的onFinished做了什么事情呢?
引用库on-finished (opens new window)
Execute a callback when a HTTP request closes, finishes, or errors.
它所做的事情就是在http的res响应对象上添加一个监听器来监听响应完成。 当响应完成时,监听器只会被调用一次。 如果响应以错误结束,则第一个参数将包含错误。 如果响应已经完成,则将调用侦听器。
# createContext
/**
* Initialize a new context.
*
* @api private
*/
createContext(req, res) {
const context = Object.create(this.context);
const request = context.request = Object.create(this.request);
const response = context.response = Object.create(this.response);
context.app = request.app = response.app = this;
context.req = request.req = response.req = req;
context.res = request.res = response.res = res;
request.ctx = response.ctx = context;
request.response = response;
response.request = request;
context.originalUrl = request.originalUrl = req.url;
context.state = {};
return context;
}
这个函数的目的是包装一个全局唯一的context。
生成的context如果放入看起来类似于是这样的
const context = {
request: {
app,
req,
res,
ctx: context,
response,
originalUrl: req.url
},
response: {
app,
req,
res,
ctx: context,
request
},
app,
req,
res,
originalUrl: req.url,
state: {}
}
详见文档app.context (opens new window)和Context (opens new window)
这里我们可以看到,和构造函数中一样,又做了一次Object.create()包装
this.context = Object.create(context);
this.request = Object.create(request);
this.response = Object.create(response);
目的就是让每次http请求都生成一个context,并且单次生成的context是全局唯一的,相互之间隔离。同样的,Object.create(this.request|response)也是同理。
这里将Object.create(this.request|response)赋值给context.request|response,这样我们就可以在context上访问到request和response。
这样做是为了让response、request、context,可以共享app、res、req这些属性,并且可以互相访问。
那么为什么要这么做呢?
一个 ctx 即可获得所有 koa 提供的数据和方法,而 koa 会继续将这些职责进行进一步的划分,比如 request 是用来进一步封装 req 的,response 是用来进一步封装 res的,这样职责得到了分散,降低了耦合,同时共享所有资源使得整个 context 具有了高内聚的性质,内部元素互相都能够访问得到。
# onerror
/**
 * Default error handler.
 *
 * @param {Error} err
 * @api private
 */
onerror(err) {
  // When dealing with cross-globals a normal `instanceof` check doesn't work properly.
  // See https://github.com/koajs/koa/issues/1466
  // We can probably remove it once jest fixes https://github.com/facebook/jest/issues/2549.
  const isNativeError =
    Object.prototype.toString.call(err) === '[object Error]' ||
    err instanceof Error;
  if (!isNativeError) throw new TypeError(util.format('non-error thrown: %j', err));

  if (404 === err.status || err.expose) return;
  if (this.silent) return;

  const msg = err.stack || err.toString();
  console.error(`\n${msg.replace(/^/gm, '  ')}\n`);
}
Koa默认错误处理方法,目的就是将错误的日志在控制台打印出来。
但是对于中间件内的异步错误,koa是无法捕捉的(除非转同步)。我们的应用如果需要记录这个错误可以用node的process监听。
process.on("unhandledRejection", (err) => {
  console.log(err);
});
流程如下:
- 404或err.expose为true时,不输出错误
- silent为true时,所有错误都不输出
- 其它错误控制台输出
我们也可以自定义错误处理逻辑,详见Error Handling (opens new window)
# default
/**
 * Help TS users comply to CommonJS, ESM, bundler mismatch.
 * @see https://github.com/koajs/koa/issues/1513
 */
static get default() {
  return Application;
}
静态方法
Application到这里处理结束。
# resopnsed
/**
 * Response helper.
 */
function respond(ctx) {
  // allow bypassing koa
  if (false === ctx.respond) return;

  if (!ctx.writable) return;

  const res = ctx.res;
  let body = ctx.body;
  const code = ctx.status;

  // ignore body
  if (statuses.empty[code]) {
    // 状态码需要空body就移除body返回
    // strip headers
    ctx.body = null;
    return res.end();
  }

  if ('HEAD' === ctx.method) {
    if (!res.headersSent && !ctx.response.has('Content-Length')) {
      const { length } = ctx.response;
      if (Number.isInteger(length)) ctx.length = length;
    }
    return res.end();
  }

  // status body
  if (null == body) {
    if (ctx.response._explicitNullBody) {
      ctx.response.remove('Content-Type');
      ctx.response.remove('Transfer-Encoding');
      return res.end();
    }
    if (ctx.req.httpVersionMajor >= 2) {
      body = String(code);
    } else {
      body = ctx.message || String(code);
    }
    if (!res.headersSent) {
      ctx.type = 'text';
      ctx.length = Buffer.byteLength(body);
    }
    return res.end(body);
  }

  // responses
  if (Buffer.isBuffer(body)) return res.end(body);
  if ('string' === typeof body) return res.end(body);
  if (body instanceof Stream) return body.pipe(res);

  // body: json
  body = JSON.stringify(body);
  if (!res.headersSent) {
    ctx.length = Buffer.byteLength(body);
  }
  res.end(body);
}
请求响应结果处理。
流程如下:
false === ctx.respond直接return结束ctx.writable不可写直接return结束statuses.empty[code]一些状态码如200、304不需要body体,直接清除并res.end()返回- 请求方法是
ctx.method是HEAD时,没有统计length方法和属性时,进行ctx.length计算并res.end()返回结果 - body不为真时
- 如果body为null,移除
Content-Type和Transfer-Encoding响应头,并返回结果 - 如果http为2+版本,设置body为对应HTTP状态码;否则先设置body为
ctx.message,不存在时在设置为状态码 ctx.headersSent不为真时,直接设置返回类型ctx.type为text,ctx.length为Buffer.byteLength(body)- 然后结束请求返回结果
- 如果body为null,移除
- body为Buffer或String时,结束请求返回结果
- body为Stream时,开启管道
body.pipe(res)操作返回 - body为json类型时,使用
JSON.stringify(body);转为字符串,并设置ctx.length后返回结果
# HttpError
/**
 * Make HttpError available to consumers of the library so that consumers don't
 * have a direct dependency upon `http-errors`
 */
module.exports.HttpError = HttpError;
http-errors: Create HTTP errors for Express, Koa, Connect, etc. with ease.
最后是httpError暴露,这边只是做引入、导出,使用库的使用者可以直接使用它,就不用依赖http-errors (opens new window)了。
# Request
A Koa
Requestobject is an abstraction on top of node's vanilla request object, providing additional functionality that is useful for every day HTTP server development.
Koa Request对象是在 node 的原生请求对象之上的抽象,提供了诸多对 HTTP 服务器开发有用的功能。
Reqeust是代码格式module.export = { ... },是一个封装的对象。
详见官方文档Request (opens new window)
# require
/**
 * Module dependencies.
 */

const URL = require('url').URL;
const net = require('net');
const accepts = require('accepts');
const contentType = require('content-type');
const stringify = require('url').format;
const parse = require('parseurl');
const qs = require('querystring');
const typeis = require('type-is');
const fresh = require('fresh');
const only = require('only');
const util = require('util');

const IP = Symbol('context#ip');
- parseurl (opens new window) 解析req结果并返回,和Node的核心模块url下的url.parse (opens new window)返回结果一直,区别是在同一时间调用多次时,会缓存解析结果,避免多次解析
- accepts (opens new window)
# header
/**
 * Return request header.
 *
 * @return {Object}
 * @api public
 */
get header() {
  return this.req.headers;
},

/**
 * Set request header.
 *
 * @api public
 */
set header(val) {
  this.req.headers = val;
},

/**
 * Return request header, alias as request.header
 *
 * @return {Object}
 * @api public
 */
get headers() {
  return this.req.headers;
},

/**
 * Set request header, alias as request.header
 *
 * @api public
 */
set headers(val) {
  this.req.headers = val;
},
设置和获取http上的headers,这边操作的是this.req.headers,即Node中http的原生请求对象的headers。headers和 http.IncomingMessage (opens new window) 上的 headers (opens new window) 字段相同。
- header() 获取和设置headers对象
- headers()获取和设置headers对象
- 两个方法作用相同
# url
/**
 * Get request URL.
 *
 * @return {String}
 * @api public
 */
get url() {
  return this.req.url;
},

/**
 * Set request URL.
 *
 * @api public
 */
set url(val) {
  this.req.url = val;
},
获取和设置req上的url
# origin
/**
 * Get origin of URL.
 *
 * @return {String}
 * @api public
 */

get origin() {
  return `${this.protocol}://${this.host}`;
},
获取URL的来源,包括 protocol 和 host。
ctx.request.origin
// => http://example.com
# href
/**
 * Get full request URL.
 *
 * @return {String}
 * @api public
 */
get href() {
  // support: `GET http://example.com/foo`
  if (/^https?:\/\//i.test(this.originalUrl)) return this.originalUrl;
  return this.origin + this.originalUrl;
},
获取完整的请求URL,包括 protocol,host 和 url。
ctx.request.href;
// => http://example.com/foo/bar?q=1
# method
/**
 * Get request method.
 *
 * @return {String}
 * @api public
 */
get method() {
  return this.req.method;
},

/**
 * Set request method.
 *
 * @param {String} val
 * @api public
 */
set method(val) {
  this.req.method = val;
},
获取和设置请求方法。
# path
/**
 * Get request pathname.
 *
 * @return {String}
 * @api public
 */
get path() {
  return parse(this.req).pathname;
},

/**
 * Set pathname, retaining the query string when present.
 *
 * @param {String} path
 * @api public
 */
set path(path) {
  const url = parse(this.req);
  if (url.pathname === path) return;

  url.pathname = path;
  url.path = null;

  this.url = stringify(url);
},
获取和设置请求路径名。设置时,会保留查询字符串。
# query
/**
 * Get parsed query string.
 *
 * @return {Object}
 * @api public
 */

get query() {
  const str = this.querystring;
  const c = this._querycache = this._querycache || {};
  return c[str] || (c[str] = qs.parse(str));
},

/**
 * Set query string as an object.
 *
 * @param {Object} obj
 * @api public
 */

set query(obj) {
  this.querystring = qs.stringify(obj);
},
获取解析的查询字符串, 当没有查询字符串时,返回一个空对象。
// "color=blue&size=small"
{
  color: 'blue',
  size: 'small'
}
设置
querystring,实际是调用Node核心模块下querystring (opens new window)下的querystring.stringify方法不支持嵌套对象
# querystring
/**
 * Get query string.
 *
 * @return {String}
 * @api public
 */

get querystring() {
  if (!this.req) return '';
  return parse(this.req).query || '';
},

/**
 * Set query string.
 *
 * @param {String} str
 * @api public
 */
set querystring(str) {
  const url = parse(this.req);
  if (url.search === `?${str}`) return;

  url.search = str;
  url.path = null;

  this.url = stringify(url);
},
获取和设置原始查询字符串
# search
/**
 * Get the search string. Same as the query string
 * except it includes the leading ?.
 *
 * @return {String}
 * @api public
 */
get search() {
  if (!this.querystring) return '';
  return `?${this.querystring}`;
},

/**
 * Set the search string. Same as
 * request.querystring= but included for ubiquity.
 *
 * @param {String} str
 * @api public
 */
set search(str) {
  this.querystring = str;
},
- 获取带问号的
querystring,与上面的get querystring()的区别是这里多个问号 - 设置
querystring
# host
/**
 * Parse the "Host" header field host
 * and support X-Forwarded-Host when a
 * proxy is enabled.
 *
 * @return {String} hostname:port
 * @api public
 */
get host() {
  const proxy = this.app.proxy;
  let host = proxy && this.get('X-Forwarded-Host');
  if (!host) {
    if (this.req.httpVersionMajor >= 2) host = this.get(':authority');
    if (!host) host = this.get('Host');
  }
  if (!host) return '';
  return host.split(/\s*,\s*/, 1)[0];
},
- 存在时获取主机(hostname:port)。当
app.proxy是 true 时支持X-Forwarded-Host,否则使用Host。
# hostname
/**
 * Parse the "Host" header field hostname
 * and support X-Forwarded-Host when a
 * proxy is enabled.
 *
 * @return {String} hostname
 * @api public
 */
get hostname() {
  const host = this.host;
  if (!host) return '';
  if ('[' === host[0]) return this.URL.hostname || ''; // IPv6
  return host.split(':', 1)[0];
},
存在时获取主机名。当 app.proxy 是 true 时支持 X-Forwarded-Host,否则使用 Host。
如果主机是 IPv6, Koa 解析到 WHATWG URL API (opens new window), 注意 这可能会影响性能。
内部调用的是this.host
# URL
/**
 * Get WHATWG parsed URL.
 * Lazily memoized.
 *
 * @return {URL|Object}
 * @api public
 */
get URL() {
  /* istanbul ignore else */
  if (!this.memoizedURL) {
    const originalUrl = this.originalUrl || ''; // avoid undefined in template string
    try {
      this.memoizedURL = new URL(`${this.origin}${originalUrl}`);
    } catch (err) {
      this.memoizedURL = Object.create(null);
    }
  }
  return this.memoizedURL;
},
获取WHATWG解析的URL (opens new window)对象。
调用Node核心模块url下的URL。
const myURL = new URL('/foo', 'https://example.org/');
// https://example.org/foo
# fresh
/**
 * Check if the request is fresh, aka
 * Last-Modified and/or the ETag
 * still match.
 *
 * @return {Boolean}
 * @api public
 */
get fresh() {
  const method = this.method;
  const s = this.ctx.status;

  // GET or HEAD for weak freshness validation only
  if ('GET' !== method && 'HEAD' !== method) return false;

  // 2xx or 304 as per rfc2616 14.26
  if ((s >= 200 && s < 300) || 304 === s) {
    return fresh(this.header, this.response.header);
  }

  return false;
},
使用库fresh (opens new window),使用请求和响应标头检查响应的新鲜度。也就是Last-Modified或ETag仍匹配。
# stale
/**
 * Check if the request is stale, aka
 * "Last-Modified" and / or the "ETag" for the
 * resource has changed.
 *
 * @return {Boolean}
 * @api public
 */
get stale() {
  return !this.fresh;
},
this.fresh取反。
# idempotent
/**
 * Check if the request is idempotent.
 *
 * @return {Boolean}
 * @api public
 */
get idempotent() {
  const methods = ['GET', 'HEAD', 'PUT', 'DELETE', 'OPTIONS', 'TRACE'];
  return !!~methods.indexOf(this.method);
},
检查请求是否是幂等的。
用来检测this.method是否是['GET', 'HEAD', 'PUT', 'DELETE', 'OPTIONS', 'TRACE']中的方法。
与下方写法结果相同。
get idempotent() {
  const methods = ['GET', 'HEAD', 'PUT', 'DELETE', 'OPTIONS', 'TRACE'];
  return methods.indexOf(this.method) !== -1;
},
我们平常开发中也可以这样来判断,先使用位操作符~进行按位非操作,再使用!!两次取值获取其本身的布尔值。写法优雅,位操作也会更快。
# socket
/**
 * Return the request socket.
 *
 * @return {Connection}
 * @api public
 */
get socket() {
  return this.req.socket;
},
返回请求套接字。
# charset
/**
 * Get the charset when present or undefined.
 *
 * @return {String}
 * @api public
 */
get charset() {
  try {
    const { parameters } = contentType.parse(this.req);
    return parameters.charset || '';
  } catch (e) {
    return '';
  }
},
存在时获取请求字符集,或者 undefined
# length
/**
 * Return parsed Content-Length when present.
 *
 * @return {Number}
 * @api public
 */
get length() {
  const len = this.get('Content-Length');
  if (len === '') return;
  return ~~len;
},
返回以数字返回请求的 Content-Length,或 undefined
将字符串转数字的一个方法,使用两次非操作符~~'10'
# protocol
/**
 * Return the protocol string "http" or "https"
 * when requested with TLS. When the proxy setting
 * is enabled the "X-Forwarded-Proto" header
 * field will be trusted. If you're running behind
 * a reverse proxy that supplies https for you this
 * may be enabled.
 *
 * @return {String}
 * @api public
 */
get protocol() {
  if (this.socket.encrypted) return 'https';
  if (!this.app.proxy) return 'http';
  const proto = this.get('X-Forwarded-Proto');
  return proto ? proto.split(/\s*,\s*/, 1)[0] : 'http';
},
返回请求协议,“https” 或 “http”。当 app.proxy 是true时支持 X-Forwarded-Proto。
# secure
/**
 * Shorthand for:
 *
 *    this.protocol == 'https'
 *
 * @return {Boolean}
 * @api public
 */
get secure() {
  return 'https' === this.protocol;
},
通过 ctx.protocol == "https" 来检查请求是否通过 TLS 发出。
# ips
/**
 * When `app.proxy` is `true`, parse
 * the "X-Forwarded-For" ip address list.
 *
 * For example if the value was "client, proxy1, proxy2"
 * you would receive the array `["client", "proxy1", "proxy2"]`
 * where "proxy2" is the furthest down-stream.
 *
 * @return {Array}
 * @api public
 */
get ips() {
  const proxy = this.app.proxy;
  const val = this.get(this.app.proxyIpHeader);
  let ips = proxy && val
    ? val.split(/\s*,\s*/)
    : [];
  if (this.app.maxIpsCount > 0) {
    ips = ips.slice(-this.app.maxIpsCount);
  }
  return ips;
},
当 X-Forwarded-For 存在并且 app.proxy 被启用时,这些 ips 的数组被返回,从上游 - >下游排序。 禁用时返回一个空数组。
# ip
/**
 * Return request's remote address
 * When `app.proxy` is `true`, parse
 * the "X-Forwarded-For" ip address list and return the first one
 *
 * @return {String}
 * @api public
 */
get ip() {
  if (!this[IP]) {
    this[IP] = this.ips[0] || this.socket.remoteAddress || '';
  }
  return this[IP];
},

set ip(_ip) {
  this[IP] = _ip;
},
请求远程地址。 当 app.proxy 是true 时支持 X-Forwarded-Proto。
# subdomains
/**
 * Return subdomains as an array.
 *
 * Subdomains are the dot-separated parts of the host before the main domain
 * of the app. By default, the domain of the app is assumed to be the last two
 * parts of the host. This can be changed by setting `app.subdomainOffset`.
 *
 * For example, if the domain is "tobi.ferrets.example.com":
 * If `app.subdomainOffset` is not set, this.subdomains is
 * `["ferrets", "tobi"]`.
 * If `app.subdomainOffset` is 3, this.subdomains is `["tobi"]`.
 *
 * @return {Array}
 * @api public
 */
get subdomains() {
  const offset = this.app.subdomainOffset;
  const hostname = this.hostname;
  if (net.isIP(hostname)) return [];
  return hostname
    .split('.')
    .reverse()
    .slice(offset);
},
以数组形式返回子域。
# accept
/**
 * Get accept object.
 * Lazily memoized.
 *
 * @return {Object}
 * @api private
 */
get accept() {
  return this._accept || (this._accept = accepts(this.req));
},

/**
 * Set accept object.
 *
 * @param {Object}
 * @api private
 */
set accept(obj) {
  this._accept = obj;
},
使用到accepts (opens new window)库。
accepts(req) : Create a new
Acceptsobject for the givenreq.
# accepts
/**
 * Check if the given `type(s)` is acceptable, returning
 * the best match when true, otherwise `false`, in which
 * case you should respond with 406 "Not Acceptable".
 *
 * The `type` value may be a single mime type string
 * such as "application/json", the extension name
 * such as "json" or an array `["json", "html", "text/plain"]`. When a list
 * or array is given the _best_ match, if any is returned.
 *
 * Examples:
 *
 *     // Accept: text/html
 *     this.accepts('html');
 *     // => "html"
 *
 *     // Accept: text/*, application/json
 *     this.accepts('html');
 *     // => "html"
 *     this.accepts('text/html');
 *     // => "text/html"
 *     this.accepts('json', 'text');
 *     // => "json"
 *     this.accepts('application/json');
 *     // => "application/json"
 *
 *     // Accept: text/*, application/json
 *     this.accepts('image/png');
 *     this.accepts('png');
 *     // => false
 *
 *     // Accept: text/*;q=.5, application/json
 *     this.accepts(['html', 'json']);
 *     this.accepts('html', 'json');
 *     // => "json"
 *
 * @param {String|Array} type(s)...
 * @return {String|Array|false}
 * @api public
 */
accepts(...args) {
  return this.accept.types(...args);
},
检查给定的 type(s) 是否可以接受,如果 true,返回最佳匹配,否则为 false。
调用accpets.type(types),这里主要用到accepts库
Return the first accepted type (and it is returned as the same text as what appears in the
typesarray). If nothing intypesis accepted, thenfalseis returned.
包含此函数在内,以下几个以accepts开头的方法,都调用了其它库进行支持,对应文档中的Content Negotiation (opens new window)
# acceptsEncodings
/**
 * Return accepted encodings or best fit based on `encodings`.
 *
 * Given `Accept-Encoding: gzip, deflate`
 * an array sorted by quality is returned:
 *
 *     ['gzip', 'deflate']
 *
 * @param {String|Array} encoding(s)...
 * @return {String|Array}
 * @api public
 */
acceptsEncodings(...args) {
  return this.accept.encodings(...args);
},
检查 encodings 是否可以接受,返回最佳匹配为 true,否则为 false。注意,应该将identity 作为编码之一!
# acceptsCharsets
/**
 * Return accepted charsets or best fit based on `charsets`.
 *
 * Given `Accept-Charset: utf-8, iso-8859-1;q=0.2, utf-7;q=0.5`
 * an array sorted by quality is returned:
 *
 *     ['utf-8', 'utf-7', 'iso-8859-1']
 *
 * @param {String|Array} charset(s)...
 * @return {String|Array}
 * @api public
 */

acceptsCharsets(...args) {
  return this.accept.charsets(...args);
},
检查 charsets 是否可以接受,在 true 时返回最佳匹配,否则为 false
# acceptsLanguages
/**
 * Return accepted languages or best fit based on `langs`.
 *
 * Given `Accept-Language: en;q=0.8, es, pt`
 * an array sorted by quality is returned:
 *
 *     ['es', 'pt', 'en']
 *
 * @param {String|Array} lang(s)...
 * @return {Array|String}
 * @api public
 */
acceptsLanguages(...args) {
  return this.accept.languages(...args);
},
检查 langs 是否可以接受,如果为 true,返回最佳匹配,否则为 false。
# is
/**
 * Check if the incoming request contains the "Content-Type"
 * header field and if it contains any of the given mime `type`s.
 * If there is no request body, `null` is returned.
 * If there is no content type, `false` is returned.
 * Otherwise, it returns the first `type` that matches.
 *
 * Examples:
 *
 *     // With Content-Type: text/html; charset=utf-8
 *     this.is('html'); // => 'html'
 *     this.is('text/html'); // => 'text/html'
 *     this.is('text/*', 'application/json'); // => 'text/html'
 *
 *     // When Content-Type is application/json
 *     this.is('json', 'urlencoded'); // => 'json'
 *     this.is('application/json'); // => 'application/json'
 *     this.is('html', 'application/*'); // => 'application/json'
 *
 *     this.is('html'); // => false
 *
 * @param {String|String[]} [type]
 * @param {String[]} [types]
 * @return {String|false|null}
 * @api public
 */

is(type, ...types) {
  return typeis(this.req, type, ...types);
},
检查传入请求是否包含 Content-Type 消息头字段, 并且包含任意的 mime type。 如果没有请求主体,返回 null。 如果没有内容类型,或者匹配失败,则返回 false。 反之则返回匹配的 content-type。
# type
/**
 * Return the request mime type void of
 * parameters such as "charset".
 *
 * @return {String}
 * @api public
 */

get type() {
  const type = this.get('Content-Type');
  if (!type) return '';
  return type.split(';')[0];
},
获取请求 Content-Type, 不含 "charset" 等参数。
# get
/**
 * Return request header.
 *
 * The `Referrer` header field is special-cased,
 * both `Referrer` and `Referer` are interchangeable.
 *
 * Examples:
 *
 *     this.get('Content-Type');
 *     // => "text/plain"
 *
 *     this.get('content-type');
 *     // => "text/plain"
 *
 *     this.get('Something');
 *     // => ''
 *
 * @param {String} field
 * @return {String}
 * @api public
 */

get(field) {
  const req = this.req;
  switch (field = field.toLowerCase()) {
    case 'referer':
    case 'referrer':
      return req.headers.referrer || req.headers.referer || '';
    default:
      return req.headers[field] || '';
  }
},
返回请求头(header), field 不区分大小写。
# inspect
/**
 * Inspect implementation.
 *
 * @return {Object}
 * @api public
 */
inspect() {
  if (!this.req) return;
  return this.toJSON();
},

/**
 * Return JSON representation.
 *
 * @return {Object}
 * @api public
 */
toJSON() {
  return only(this, [
    'method',
    'url',
    'header'
  ]);
}
实现inspect方法
# 其它
/**
 * Custom inspection implementation for newer Node.js versions.
 *
 * @return {Object}
 * @api public
 */
/* istanbul ignore else */
if (util.inspect.custom) {
  module.exports[util.inspect.custom] = module.exports.inspect;
}
# response
A Koa
Responseobject is an abstraction on top of node's vanilla response object, providing additional functionality that is useful for every day HTTP server development.
Koa Response 对象是在 node 的原生响应对象之上的抽象,提供了诸多对 HTTP 服务器开发有用的功能。
Response是代码格式module.export = { ... },是一个封装的对象。
详见官方文档Response (opens new window)
# require
/**
 * Module dependencies.
 */
const contentDisposition = require('content-disposition');
const getType = require('cache-content-type');
const onFinish = require('on-finished');
const escape = require('escape-html');
const typeis = require('type-is').is;
const statuses = require('statuses');
const destroy = require('destroy');
const assert = require('assert');
const extname = require('path').extname;
const vary = require('vary');
const only = require('only');
const util = require('util');
const encodeUrl = require('encodeurl');
const Stream = require('stream');
# socket
/**
 * Return the request socket.
 *
 * @return {Connection}
 * @api public
 */
get socket() {
  return this.res.socket;
},
响应套接字。 作为 request.socket 指向 net.Socket 实例。
# header
/**
 * Return response header.
 *
 * @return {Object}
 * @api public
 */

get header() {
  const { res } = this;
  return typeof res.getHeaders === 'function'
    ? res.getHeaders()
    : res._headers || {}; // Node < 7.7
},
响应头对象。
# headers
/**
 * Return response header, alias as response.header
 *
 * @return {Object}
 * @api public
 */

get headers() {
  return this.header;
},
响应头对象。header的别名方法
# status
/**
 * Get response status code.
 *
 * @return {Number}
 * @api public
 */
get status() {
  return this.res.statusCode;
},

/**
 * Set response status code.
 *
 * @param {Number} code
 * @api public
 */
set status(code) {
  if (this.headerSent) return;

  assert(Number.isInteger(code), 'status code must be a number');
  assert(code >= 100 && code <= 999, `invalid status code: ${code}`);
  this._explicitStatus = true;
  this.res.statusCode = code;
  if (this.req.httpVersionMajor < 2) this.res.statusMessage = statuses[code];
  if (this.body && statuses.empty[code]) this.body = null;
},
- 获取响应状态。默认情况下,
response.status设置为404而不是像 node 的res.statusCode那样默认为200。 - 通过数字代码设置响应状态 100 200 404 503等
# messgae
/**
 * Get response status message
 *
 * @return {String}
 * @api public
 */
get message() {
  return this.res.statusMessage || statuses[this.status];
},

/**
 * Set response status message
 *
 * @param {String} msg
 * @api public
 */
set message(msg) {
  this.res.statusMessage = msg;
},
- 获取响应的状态消息.。默认情况下,
response.message与response.status关联。 - 将响应的状态消息设置为给定值
# body
/**
 * Get response body.
 *
 * @return {Mixed}
 * @api public
 */

get body() {
  return this._body;
},

/**
 * Set response body.
 *
 * @param {String|Buffer|Object|Stream} val
 * @api public
 */

set body(val) {
  const original = this._body;
  this._body = val;

  // no content
  if (null == val) {
    if (!statuses.empty[this.status]) this.status = 204;
    if (val === null) this._explicitNullBody = true;
    this.remove('Content-Type');
    this.remove('Content-Length');
    this.remove('Transfer-Encoding');
    return;
  }

  // set the status
  if (!this._explicitStatus) this.status = 200;

  // set the content-type only if not yet set
  const setType = !this.has('Content-Type');

  // string
  if ('string' === typeof val) {
    if (setType) this.type = /^\s*</.test(val) ? 'html' : 'text';
    this.length = Buffer.byteLength(val);
    return;
  }

  // buffer
  if (Buffer.isBuffer(val)) {
    if (setType) this.type = 'bin';
    this.length = val.length;
    return;
  }

  // stream
  if (val instanceof Stream) {
    onFinish(this.res, destroy.bind(null, val));
    if (original != val) {
      val.once('error', err => this.ctx.onerror(err));
      // overwriting
      if (null != original) this.remove('Content-Length');
    }

    if (setType) this.type = 'bin';
    return;
  }

  // json
  this.remove('Content-Length');
  this.type = 'json';
},
- 获取响应主体
- 设置响应主体
- 无body体,设置状态为204,清除不需要的响应头;其它情况均设置状态码为200
StringContent-Type 默认为text/html或text/plain, 同时默认字符集是 utf-8。Content-Length 字段也是如此。BufferContent-Type 默认为application/octet-stream, 并且 Content-Length 字段也是如此。StreamContent-Type 默认为application/octet-stream。JsonContent-Type 默认为application/json。这包括普通的对象{ foo: 'bar' }和数组['foo', 'bar']。
# length
/**
 * Set Content-Length field to `n`.
 *
 * @param {Number} n
 * @api public
 */

set length(n) {
  this.set('Content-Length', n);
},

/**
 * Return parsed response Content-Length when present.
 *
 * @return {Number}
 * @api public
 */

get length() {
  if (this.has('Content-Length')) {
    return parseInt(this.get('Content-Length'), 10) || 0;
  }

  const { body } = this;
  if (!body || body instanceof Stream) return undefined;
  if ('string' === typeof body) return Buffer.byteLength(body);
  if (Buffer.isBuffer(body)) return body.length;
  return Buffer.byteLength(JSON.stringify(body));
},
- 将响应的 Content-Length 设置为给定值。
- 以数字返回响应的 Content-Length,或者从
ctx.body推导出来,或者undefined(stream)
# headersSent
/**
 * Check if a header has been written to the socket.
 *
 * @return {Boolean}
 * @api public
 */

get headerSent() {
  return this.res.headersSent;
},
- 检查是否已经发送了响应头。
# vary
/**
 * Vary on `field`.
 *
 * @param {String} field
 * @api public
 */

vary(field) {
  if (this.headerSent) return;

  vary(this.res, field);
},
设置 field 的 vary
# redirect
/**
 * Perform a 302 redirect to `url`.
 *
 * The string "back" is special-cased
 * to provide Referrer support, when Referrer
 * is not present `alt` or "/" is used.
 *
 * Examples:
 *
 *    this.redirect('back');
 *    this.redirect('back', '/index.html');
 *    this.redirect('/login');
 *    this.redirect('http://google.com');
 *
 * @param {String} url
 * @param {String} [alt]
 * @api public
 */
redirect(url, alt) {
  // location
  if ('back' === url) url = this.ctx.get('Referrer') || alt || '/';
  this.set('Location', encodeUrl(url));

  // status
  if (!statuses.redirect[this.status]) this.status = 302;

  // html
  if (this.ctx.accepts('html')) {
    url = escape(url);
    this.type = 'text/html; charset=utf-8';
    this.body = `Redirecting to <a href="${url}">${url}</a>.`;
    return;
  }

  // text
  this.type = 'text/plain; charset=utf-8';
  this.body = `Redirecting to ${url}.`;
},
执行 [302] 重定向到 url。
# attachment
/**
 * Set Content-Disposition header to "attachment" with optional `filename`.
 *
 * @param {String} filename
 * @api public
 */
attachment(filename, options) {
  if (filename) this.type = extname(filename);
  this.set('Content-Disposition', contentDisposition(filename, options));
},
将 Content-Disposition 设置为 “附件” 以指示客户端提示下载。(可选)指定下载的 filename 和部分 参数 (opens new window)。
使用库content-disposition (opens new window)
# type
/**
 * Return the response mime type void of
 * parameters such as "charset".
 *
 * @return {String}
 * @api public
 */

get type() {
  const type = this.get('Content-Type');
  if (!type) return '';
  return type.split(';', 1)[0];
},

/**
 * Set Content-Type response header with `type` through `mime.lookup()`
 * when it does not contain a charset.
 *
 * Examples:
 *
 *     this.type = '.html';
 *     this.type = 'html';
 *     this.type = 'json';
 *     this.type = 'application/json';
 *     this.type = 'png';
 *
 * @param {String} type
 * @api public
 */
set type(type) {
  type = getType(type);
  if (type) {
    this.set('Content-Type', type);
  } else {
    this.remove('Content-Type');
  }
},
- 获取响应
Content-Type, 不含charset等参数。 - 设置响应
Content-Type通过 mime 字符串或文件扩展名。
使用库cache-content-type,这个库实际上使用的是mime-types (opens new window)
# lastModified
/**
 * Get the Last-Modified date in Date form, if it exists.
 *
 * @return {Date}
 * @api public
 */

get lastModified() {
  const date = this.get('last-modified');
  if (date) return new Date(date);
},

/**
 * Set the Last-Modified date using a string or a Date.
 *
 *     this.response.lastModified = new Date();
 *     this.response.lastModified = '2013-09-13';
 *
 * @param {String|Date} type
 * @api public
 */

set lastModified(val) {
  if ('string' === typeof val) val = new Date(val);
  this.set('Last-Modified', val.toUTCString());
},
- 获取
Last-Modified - 设置
Last-Modified
# etag
/**
 * Get the ETag of a response.
 *
 * @return {String}
 * @api public
 */

get etag() {
  return this.get('ETag');
},

/**
 * Set the ETag of a response.
 * This will normalize the quotes if necessary.
 *
 *     this.response.etag = 'md5hashsum';
 *     this.response.etag = '"md5hashsum"';
 *     this.response.etag = 'W/"123456789"';
 *
 * @param {String} etag
 * @api public
 */

set etag(val) {
  if (!/^(W\/)?"/.test(val)) val = `"${val}"`;
  this.set('ETag', val);
},
- 设置和获取ETag
# is
/**
 * Check whether the response is one of the listed types.
 * Pretty much the same as `this.request.is()`.
 *
 * @param {String|String[]} [type]
 * @param {String[]} [types]
 * @return {String|false}
 * @api public
 */
is(type, ...types) {
  return typeis(this.type, type, ...types);
},
检查响应类型是否是所提供的类型之一。
# get
/**
 * Return response header.
 *
 * Examples:
 *
 *     this.get('Content-Type');
 *     // => "text/plain"
 *
 *     this.get('content-type');
 *     // => "text/plain"
 *
 * @param {String} field
 * @return {String}
 * @api public
 */
get(field) {
  return this.header[field.toLowerCase()] || '';
},
不区分大小写获取响应头字段值 field。
# has
/**
 * Returns true if the header identified by name is currently set in the outgoing headers.
 * The header name matching is case-insensitive.
 *
 * Examples:
 *
 *     this.has('Content-Type');
 *     // => true
 *
 *     this.get('content-type');
 *     // => true
 *
 * @param {String} field
 * @return {boolean}
 * @api public
 */

has(field) {
  return typeof this.res.hasHeader === 'function'
    ? this.res.hasHeader(field)
    // Node < 7.7
    : field.toLowerCase() in this.headers;
},
如果当前在响应头中设置了由名称标识的消息头,则返回 true. 消息头名称匹配不区分大小写。
# set
/**
 * Set header `field` to `val` or pass
 * an object of header fields.
 *
 * Examples:
 *
 *    this.set('Foo', ['bar', 'baz']);
 *    this.set('Accept', 'application/json');
 *    this.set({ Accept: 'text/plain', 'X-API-Key': 'tobi' });
 *
 * @param {String|Object|Array} field
 * @param {String} val
 * @api public
 */
set(field, val) {
  if (this.headerSent) return;

  if (2 === arguments.length) {
    if (Array.isArray(val)) val = val.map(v => typeof v === 'string' ? v : String(v));
    else if (typeof val !== 'string') val = String(val);
    this.res.setHeader(field, val);
  } else {
    for (const key in field) {
      this.set(key, field[key]);
    }
  }
},
设置响应头 field 值为 value,val可为String|Object|Array
# append
/**
 * Append additional header `field` with value `val`.
 *
 * Examples:
 *
 * ```
 * this.append('Link', ['<http://localhost/>', '<http://localhost:3000/>']);
 * this.append('Set-Cookie', 'foo=bar; Path=/; HttpOnly');
 * this.append('Warning', '199 Miscellaneous warning');
 * ```
 *
 * @param {String} field
 * @param {String|Array} val
 * @api public
 */
append(field, val) {
  const prev = this.get(field);

  if (prev) {
    val = Array.isArray(prev)
      ? prev.concat(val)
      : [prev].concat(val);
  }

  return this.set(field, val);
},
用值 val 附加额外的消息头 field
# remove
/**
 * Remove header `field`.
 *
 * @param {String} name
 * @api public
 */

remove(field) {
  if (this.headerSent) return;

  this.res.removeHeader(field);
},
删除消息头 field
# writable
/**
 * Checks if the request is writable.
 * Tests for the existence of the socket
 * as node sometimes does not set it.
 *
 * @return {Boolean}
 * @api private
 */
get writable() {
  // can't write any more after response finished
  // response.writableEnded is available since Node > 12.9
  // https://nodejs.org/api/http.html#http_response_writableended
  // response.finished is undocumented feature of previous Node versions
  // https://stackoverflow.com/questions/16254385/undocumented-response-finished-in-node-js
  if (this.res.writableEnded || this.res.finished) return false;

  const socket = this.res.socket;
  // There are already pending outgoing res, but still writable
  // https://github.com/nodejs/node/blob/v4.4.7/lib/_http_server.js#L486
  if (!socket) return true;
  return socket.writable;
},
获取request是否可写
# inspect
/**
 * Inspect implementation.
 *
 * @return {Object}
 * @api public
 */
inspect() {
  if (!this.res) return;
  const o = this.toJSON();
  o.body = this.body;
  return o;
},

/**
 * Return JSON representation.
 *
 * @return {Object}
 * @api public
 */
toJSON() {
  return only(this, [
    'status',
    'message',
    'header'
  ]);
},
# flushHeaders
/**
 * Flush any set headers and begin the body
 */
flushHeaders() {
  this.res.flushHeaders();
}
绕过优化启动请求
# 其它
/**
 * Custom inspection implementation for node 6+.
 *
 * @return {Object}
 * @api public
 */
/* istanbul ignore else */
if (util.inspect.custom) {
  module.exports[util.inspect.custom] = module.exports.inspect;
}
# Context
A Koa Context encapsulates node's
requestandresponseobjects into a single object which provides many helpful methods for writing web applications and APIs.
每个请求都将创建一个 Context,并在中间件中作为接收器引用,或者 ctx 标识符。
Context (opens new window)中的方法其实很少,之所以能够再ctx中获取到很多方法,是用到了委托模式。
Context的结构为const proto = module.exports = { ... },与request.js和response.js结构基本相同,不同的是赋值给了proto,目的是给委托模式使用。
# require
/**
 * Module dependencies.
 */

const util = require('util');
const createError = require('http-errors');
const httpAssert = require('http-assert');
const delegate = require('delegates');
const statuses = require('statuses');
const Cookies = require('cookies');

const COOKIES = Symbol('context#cookies');
# inspect
/**
 * util.inspect() implementation, which
 * just returns the JSON output.
 *
 * @return {Object}
 * @api public
 */
inspect() {
  if (this === proto) return this;
  return this.toJSON();
},

/**
 * Return JSON representation.
 *
 * Here we explicitly invoke .toJSON() on each
 * object, as iteration will otherwise fail due
 * to the getters and cause utilities such as
 * clone() to fail.
 *
 * @return {Object}
 * @api public
 */
toJSON() {
  return {
    request: this.request.toJSON(),
    response: this.response.toJSON(),
    app: this.app.toJSON(),
    originalUrl: this.originalUrl,
    req: '<original node req>',
    res: '<original node res>',
    socket: '<original node socket>'
  };
},
# assert
/**
 * Similar to .throw(), adds assertion.
 *
 *    this.assert(this.user, 401, 'Please login!');
 *
 * See: https://github.com/jshttp/http-assert
 *
 * @param {Mixed} test
 * @param {Number} status
 * @param {String} message
 * @api public
 */
assert: httpAssert,
koa 使用 http-assert (opens new window) 作为断言。
当 !value 时抛出一个类似 .throw 错误的帮助方法。
# throw
/**
 * Throw an error with `status` (default 500) and
 * `msg`. Note that these are user-level
 * errors, and the message may be exposed to the client.
 *
 *    this.throw(403)
 *    this.throw(400, 'name required')
 *    this.throw('something exploded')
 *    this.throw(new Error('invalid'))
 *    this.throw(400, new Error('invalid'))
 *
 * See: https://github.com/jshttp/http-errors
 *
 * Note: `status` should only be passed as the first parameter.
 *
 * @param {String|Number|Error} err, msg or status
 * @param {String|Number|Error} [err, msg or status]
 * @param {Object} [props]
 * @api public
 */
throw(...args) {
  throw createError(...args);
},
用来抛出一个包含 .status 属性错误的帮助方法,其默认值为 500。这样 Koa 就可以做出适当地响应。
koa 使用 http-errors (opens new window) 来创建错误。status 只应作为第一个参数传递
# onerror
/**
 * Default error handling.
 *
 * @param {Error} err
 * @api private
 */
onerror(err) {
  // don't do anything if there is no error.
  // this allows you to pass `this.onerror`
  // to node-style callbacks.
  if (null == err) return;

  // When dealing with cross-globals a normal `instanceof` check doesn't work properly.
  // See https://github.com/koajs/koa/issues/1466
  // We can probably remove it once jest fixes https://github.com/facebook/jest/issues/2549.
  const isNativeError =
    Object.prototype.toString.call(err) === '[object Error]' ||
    err instanceof Error;
  if (!isNativeError) err = new Error(util.format('non-error thrown: %j', err));

  let headerSent = false;
  if (this.headerSent || !this.writable) {
    headerSent = err.headerSent = true;
  }

  // delegate
  this.app.emit('error', err, this);

  // nothing we can do here other
  // than delegate to the app-level
  // handler and log.
  if (headerSent) {
    return;
  }

  const { res } = this;

  // first unset all headers
  /* istanbul ignore else */
  if (typeof res.getHeaderNames === 'function') {
    res.getHeaderNames().forEach(name => res.removeHeader(name));
  } else {
    res._headers = {}; // Node < 7.7
  }

  // then set those specified
  this.set(err.headers);

  // force text/plain
  this.type = 'text';

  let statusCode = err.status || err.statusCode;

  // ENOENT support
  if ('ENOENT' === err.code) statusCode = 404;

  // default to 500
  if ('number' !== typeof statusCode || !statuses[statusCode]) statusCode = 500;

  // respond
  const code = statuses[statusCode];
  const msg = err.expose ? err.message : code;
  this.status = err.status = statusCode;
  this.length = Buffer.byteLength(msg);
  res.end(msg);
},
处理了发生error时ctx的情况,同时把error交给application进行处理。
发生错误时:
会将错误
this.app.emit('error', err, this);委托给aplication处理,application错误处理详见上文。主要看下方处理流程
如果已发送响应头,直接return结束
移除原
headers,并设置错误时的headers设置
type为text,再根据情况设置错误码错误码非数字或非正确错误码,默认设置
500然后
response响应
# cookies
get cookies() {
  if (!this[COOKIES]) {
    this[COOKIES] = new Cookies(this.req, this.res, {
      keys: this.app.keys,
      secure: this.request.secure
    });
  }
  return this[COOKIES];
},

set cookies(_cookies) {
    this[COOKIES] = _cookies;
}
koa 使用 cookies (opens new window) 模块实现cookie
# 其它
/**
 * Custom inspection implementation for newer Node.js versions.
 *
 * @return {Object}
 * @api public
 */

/* istanbul ignore else */
if (util.inspect.custom) {
  module.exports[util.inspect.custom] = module.exports.inspect;
}
# 委托
/**
 * Response delegation.
 */
delegate(proto, 'response')
  .method('attachment')
  .method('redirect')
  .method('remove')
  .method('vary')
  .method('has')
  .method('set')
  .method('append')
  .method('flushHeaders')
  .access('status')
  .access('message')
  .access('body')
  .access('length')
  .access('type')
  .access('lastModified')
  .access('etag')
  .getter('headerSent')
  .getter('writable');

/**
 * Request delegation.
 */
delegate(proto, 'request')
  .method('acceptsLanguages')
  .method('acceptsEncodings')
  .method('acceptsCharsets')
  .method('accepts')
  .method('get')
  .method('is')
  .access('querystring')
  .access('idempotent')
  .access('socket')
  .access('search')
  .access('method')
  .access('query')
  .access('path')
  .access('url')
  .access('accept')
  .getter('origin')
  .getter('href')
  .getter('subdomains')
  .getter('protocol')
  .getter('host')
  .getter('hostname')
  .getter('URL')
  .getter('header')
  .getter('headers')
  .getter('secure')
  .getter('stale')
  .getter('fresh')
  .getter('ips')
  .getter('ip');
上面所有的方法在ctx中都可以直接使用,实际上执行的是Request和Response中定义的方法。
主要是借助delegates (opens new window)库实现。
首先调用delegate(proto, 'request')创建委托实例
/**
 * Initialize a delegator.
 *
 * @param {Object} proto
 * @param {String} target
 * @api public
 */

function Delegator(proto, target) {
  if (!(this instanceof Delegator)) return new Delegator(proto, target);
  this.proto = proto;
  this.target = target;
  this.methods = [];
  this.getters = [];
  this.setters = [];
  this.fluents = [];
}
之后主要调用method、access、getter方法。
method方法
/**
 * Delegate method `name`.
 *
 * @param {String} name
 * @return {Delegator} self
 * @api public
 */
Delegator.prototype.method = function(name){
  var proto = this.proto;
  var target = this.target;
  this.methods.push(name);

  proto[name] = function(){
    return this[target][name].apply(this[target], arguments);
  };

  return this;
};
此方法的目的,就是调用proto,Koa的ctx上的方法,可以代理访问target(Request|Response)中的方法。
这边对proto做一层封装,如调用ctx.attachment时,这边的方法执行时看起来是这样子的
ctx['attachment'] = function() {
  return this['response']['attachment'].apply(this['response'], arguments);
}
实际就是这样进行了委托处理。
getter方法
/**
 * Delegator getter `name`.
 *
 * @param {String} name
 * @return {Delegator} self
 * @api public
 */

Delegator.prototype.getter = function(name){
  var proto = this.proto;
  var target = this.target;
  this.getters.push(name);

  proto.__defineGetter__(name, function(){
    return this[target][name];
  });

  return this;
};
通过__defineGetter__劫持proto的get,转而去访问target。目前官方建议使用Object.defineProroty或Proxy进行劫持达到相同的效果。
setter方法
/**
 * Delegator setter `name`.
 *
 * @param {String} name
 * @return {Delegator} self
 * @api public
 */
Delegator.prototype.setter = function(name){
  var proto = this.proto;
  var target = this.target;
  this.setters.push(name);

  proto.__defineSetter__(name, function(val){
    return this[target][name] = val;
  });

  return this;
};
与getter方法相同。
access方法
/**
 * Delegator accessor `name`.
 *
 * @param {String} name
 * @return {Delegator} self
 * @api public
 */
Delegator.prototype.access = function(name){
  return this.getter(name).setter(name);
};
引用getter和setter方法。
我们在使用诸如ctx.body时,这里的context将它们委托给request和respense。
# 实现Koa
这里主要对application进行简单的实现,加强对Koa的理解。
我们在使用Koa时,代码大致如下
const Koa = require('koa');
const app = new Koa();

const middleware1 = async (ctx, next) => {
  console.log(1);
  await next();
  console.log(6);
}

const middleware2 = async (ctx, next) => {
  console.log(2);
  await next();
  console.log(5);
}

const middleware3 = async (ctx, next) => {
  console.log(3);
  await next();
  console.log(4);
}

app.use(middleware1);
app.use(middleware2);
app.use(middleware3);
app.use(async (ctx, next) => {
  ctx.body = 'hello world';
});

app.listen(3000, () => {
  console.log('starting at port 3000')
});
之所以可以这样做,得益于中间件引擎。上面也说到了中间件引擎的原理,那么我们再来一步步时间中间件引擎。
# 中间件引擎返回的形式
这里使用Promse进行实现
const context = {
  data: []
};

async function middleware1(ctx, next) {
  console.log('action 001');
  ctx.data.push(1);
  await next();
  console.log('action 006');
  ctx.data.push(6);
}

async function middleware2(ctx, next) {
  console.log('action 002');
  ctx.data.push(2);
  await next();
  console.log('action 005');
  ctx.data.push(5);
}

async function middleware3(ctx, next) {
  console.log('action 003');
  ctx.data.push(3);
  await next();
  console.log('action 004');
  ctx.data.push(4);
}


Promise.resolve(middleware1(context, async () => {
  return Promise.resolve(middleware2(context, async () => {
    return Promise.resolve(middleware3(context, async () => {
      return Promise.resolve();
    }));
  }));
}))
  .then(() => {
    console.log('end');
    console.log('context = ', context);
  });
这里我们看到是一层层嵌套的Promise,中间件返回的形态就是这样的
# compose实现
接着我们对嵌套的Promise部分进行抽象实现,就是compose
function compose(middlewares) {
  if(!Array.isArray(middlewares)) {
    throw new TypeError('middlewares must be an array');
  }

  return function(ctx, next) {
    let index = -1;

    function dispatch (i) {
      if (i <= index) {
        return Promise.reject(new Error('multiple calls'));
      }

      index = i

      let fn = middlewares[i];

      if (i === middlewares.length) {
        fn = next;
      }

      if (!fn) {
        return Promise.resolve();
      }

      try {
        return Promise.resolve(fn(ctx, () => {
          return dispatch(i + 1);
        }));
      } catch (error) {
        return Promise.reject(error);
      }
    }

    return dispatch(0);
  }
}
试用中间件
let middleware = [];
let context = {
  data: []
};

middleware.push(async(ctx, next) => {
  console.log('action 001');
  ctx.data.push(1);
  await next();
  console.log('action 006');
  ctx.data.push(6);
});

middleware.push(async(ctx, next) => {
  console.log('action 002');
  ctx.data.push(2);
  await next();
  console.log('action 005');
  ctx.data.push(5);
});

middleware.push(async(ctx, next) => {
  console.log('action 003');
  ctx.data.push(3);
  await next();
  console.log('action 004');
  ctx.data.push(4);
});

const fn = compose(middleware);

fn(context)
  .then(() => {
    console.log('end');
    console.log('context = ', context);
  });
# 最简单的Koa
这里包含了compose的实现
const http = require('http');
const Emitter = require('events');

const context = {
  _body: null,
  get body () {
    return this._body;
  },
  set body (val) {
    this._body = val;
    this.res.end(this._body);
  }
};

class SimpleKoa extends Emitter {
  constructor() {
    super();
    this.middleware = [];
    this.context = Object.create(context);
  }

  listen (...args) {
    const server = http.createServer(this.callback());
    return server.listen(...args);
  }

  onerror(error) {
    console.log(error);
  }

  use(fn) {
    if (typeof fn === 'function') {
      this.middleware.push(fn);
    }
  }

  callback() {
    if (this.listeners('error').length !== 0) {
      this.on('error', this.onerror);
    }

    return (req, res) => {
      const context = this.createContext(req, res);

      const middleware = this.middleware;

      this.compose(middleware)(context)
        .catch(err => this.onerror(err))
    }
  }

  compose (middleware) {
    if(!Array.isArray(middleware)) {
      throw new TypeError('middleware must be an array');
    }

    let index = -1;

    return function (ctx, next) {
      const dispatch = (i) => {
        if (i <= index) {
          return Promise.reject(new Error('multiple calls'));
        }

        index = i;

        const fn = middleware[i];

        if (i === middleware.length) {
          fn = next;
        }

        if (!fn) {
          return Promise.resolve();
        }

        return new Promise((resolve, reject) => {
          try {
            resolve(fn(ctx, () => {
              return dispatch(i + 1);
            }));
          } catch (error) {
            reject(error);
          }
        });
      }

      return dispatch(0);
    }
  }

  createContext (req, res) {
    const context = Object.create(this.context);
    context.req = req;
    context.res = res;
    return context;
  }
}


const app = new SimpleKoa();
const PORT = 3001;

app.use(async (ctx, next) => {
  console.log('woshi中间件啊', ctx.hello = 'world')
  await next();
});

app.use(async ctx => {
  ctx.body = '<p>this is a body</p>';
});


app.listen(PORT, () => {
  console.log(`the web server is starting at port ${PORT}`);
});
参考:
- https://github.com/koajs/koa
- https://github.com/demopark/koa-docs-Zh-CN
- https://chenshenhai.com/koajs-design-note/note/chapter01/05
- https://juejin.cn/post/6855129007508488206