 Webpack中的TreeShaking以及其它优化
# Webpack中的TreeShaking以及其它优化
# TreeShaking
# 认识TreeShaking
Tree Shaking是一个术语,在计算机中表示消除死代码(dead_code)。
最早起源于LISP,用于消除未调用的代码。LISP编程的核心就是函数,其中有一个概念叫作纯函数。
纯函数表示函数的执行不会产生任何副作用,那么如果这个函数没被调用过,就可以放心地删除未调用的函数,这也是为什么要求我们在进行函数式编程时,尽量使用纯函数的原因之一。
后来Tree Shaking也被应用于其他的语言,比如JavaScript、Dart。
JavaScript的Tree Shaking,源自于打包工具rollup (opens new window)。
- Tree Shaking依赖于ES Module的静态语法分析,即不执行任何的代码,可以明确知道模块的依赖关系;
- webpack2正式内置支持了ES2015模块,和检测未使用模块的能力;
- 在webpack4正式扩展了这个能力,并且通过
package.json的sideEffects属性作为标记,告知webpack在编译时,哪里文件可以安全的删除掉; - webpack5中,也提供了对部分CommonJS的tree shaking支持 (opens new window);
# JS实现TreeShaking
webpack实现Tree Shaking采用了两种不同的方案:
usedExports:通过标记某些函数是否被使用,之后通过Terser来进行优化的;sideEffects:跳过整个模块/文件,直接查看该文件是否有副作用;
这是两种独立方案,每种方案有自己对应的使用场景。
https://webpack.docschina.org/guides/tree-shaking#clarifying-tree-shaking-and-sideeffects
sideEffects(opens new window) 和usedExports(opens new window)(更多被认为是 tree shaking)是两种不同的优化方式。
# usedExports
usedExports配置用来标注出来模块中哪个函数没有使用,然后被其它优化手段或代码生成使用。如被Terser用来做TreeShaking。
为了测试此参数,我们将webpack.prod.js中mode设置为development,因为production模式下,默认已开启usedExports (opens new window),该配置需要与Terser配合使用,Webpack默认也已开启了这些优化,那就produciton模式下就无法看到usedExports作用下TreeShaking的中间过程。
具体配置如下:
const { merge } = require('webpack-merge');
const baseConfig = require('./webpack.base');
const TerserPlugin = require('terser-webpack-plugin');

module.exports = merge(baseConfig, {
  mode: "development",
  devtool: 'source-map',
  optimization: {
    usedExports: true
  }
})
入口文件index.js和math.js
// index.js
import { sum } from "./math.js";

console.log(sum(2, 2))

// math.js
export function sum(num1, num2) {
  return num1 + num2;
}

export function mul(num1, num2) {
  return num1 * num2;
}
执行npm run build,得到main.0d327d.bundle.js:
/******/ (() => { // webpackBootstrap
/******/ 	"use strict";
/******/ 	var __webpack_modules__ = ({

/***/ "./src/math.js":
/*!*********************!*\
  !*** ./src/math.js ***!
  \*********************/
/***/ ((__unused_webpack_module, __webpack_exports__, __webpack_require__) => {

/* harmony export */ __webpack_require__.d(__webpack_exports__, {
/* harmony export */   "sum": () => (/* binding */ sum)
/* harmony export */ });
/* unused harmony export mul */
function sum(num1, num2) {
  return num1 + num2;
}
function mul(num1, num2) {
  return num1 * num2;
}

/***/ })

/******/ 	});

// 省略部分代码...
/******/ })();
上面的打包文件中,可以看到一段注释:/* unused harmony export mul */,这段注释的意义在于,告知Terser在优化时,可以删除掉函数mul()这段代码。
配合Terser使用,配置如下:
const { merge } = require('webpack-merge');
const baseConfig = require('./webpack.base');
const TerserPlugin = require('terser-webpack-plugin');

module.exports = merge(baseConfig, {
  mode: "development",
  devtool: 'source-map',
  optimization: {
    usedExports: true,
    minimize: true,
    minimizer: [
      new TerserPlugin({
        extractComments: false,
        terserOptions: {
          compress: {
            arguments: true
          },
          mangle: true,
          toplevel: true,
          keep_classnames: true,
          keep_fnames: true
        }
      }),
      new CssMinimizerPlugin()
    ]
  }
})
执行npm run build,
(() => {
  "use strict";
  var e,
    r = {
      "./src/math.js": /*!*********************!*\
  !*** ./src/math.js ***!
  \*********************/ (e, r, _) => {
        function sum(e, r) {
          return e + r;
        }
        _.d(r, { sum: () => sum });
      },
    },
    _ = {};
  function __webpack_require__(e) {
    var t = _[e];
    if (void 0 !== t) return t.exports;
    var o = (_[e] = { exports: {} });
    return r[e](o, o.exports, __webpack_require__), o.exports;
  }
  (__webpack_require__.d = (e, r) => {
    for (var _ in r)
      __webpack_require__.o(r, _) &&
        !__webpack_require__.o(e, _) &&
        Object.defineProperty(e, _, { enumerable: !0, get: r[_] });
  }),
    (__webpack_require__.o = (e, r) =>
      Object.prototype.hasOwnProperty.call(e, r)),
    (e = __webpack_require__(/*! ./math.js */ "./src/math.js")),
    console.log((0, e.sum)(2, 2));
})();
//# sourceMappingURL=main.6319c9.bundle.js.map
usedExports设置为true时,和Terser结合,就移除了没有使用的函数mul()。
生产模式下该配置时默认开启的,Terser也有默认的配置,比如下面的配置:
const { merge } = require('webpack-merge');
const baseConfig = require('./webpack.base');

module.exports = merge(baseConfig, {
  mode: "production",
})
执行npm run build生成的代码如下:
(()=>{"use strict";console.log(4)})();
生产模式下Webpack默认做了很多打包优化。
# sideEffects
默认值为true,表示模块有副作用。
sideEffects用于告知 webpack 哪些模块是没有副作用的,用于跳过那些当导出不被使用且被标记不包含副作用的模块。
这里使用development模式做测试,因为production模式下的优化一步到位,看不到sideEffects的效果。
比如有一个模块format.js
export function dateFormat() {
  return '2022-06-13';
}
在入口文件main.js中做如下导入:
import { sum } from "./math.js";
import "./format"

console.log(sum(2, 2))
webpack配置如下:
const { merge } = require('webpack-merge');
const baseConfig = require('./webpack.base');
const MiniCssExtractPlugin = require("mini-css-extract-plugin");
const TerserPlugin = require('terser-webpack-plugin');
const CssMinimizerPlugin = require("css-minimizer-webpack-plugin");

module.exports = merge(baseConfig, {
  mode: "development",
  devtool: 'source-map',
  optimization: {
    usedExports: true,
    minimize: true,
    minimizer: [
      new TerserPlugin({
        extractComments: false,
        terserOptions: {
          compress: {
            arguments: true
          },
          mangle: true,
          toplevel: true,
          keep_classnames: true,
          keep_fnames: true
        }
      }),
      new CssMinimizerPlugin()
    ]
  }
})
打包文件如下:
(()=>{"use strict";var r={"./src/format.js":
/*!***********************!*\
  !*** ./src/format.js ***!
  \***********************/(r,e,_)=>{},"./src/math.js":
/*!*********************!*\
  !*** ./src/math.js ***!
  \*********************/(r,e,_)=>{function sum(r,e){return r+e}_.d(e,{sum:()=>sum})}},e={};function __webpack_require__(_){var t=e[_];if(void 0!==t)return t.exports;var a=e[_]={exports:{}};return r[_](a,a.exports,__webpack_require__),a.exports}__webpack_require__.d=(r,e)=>{for(var _ in e)__webpack_require__.o(e,_)&&!__webpack_require__.o(r,_)&&Object.defineProperty(r,_,{enumerable:!0,get:e[_]})},__webpack_require__.o=(r,e)=>Object.prototype.hasOwnProperty.call(r,e),(()=>{
/*!*********************!*\
  !*** ./src/main.js ***!
  \*********************/var r=__webpack_require__(/*! ./math.js */"./src/math.js");__webpack_require__(/*! ./format */"./src/format.js");console.log((0,r.sum)(2,2))})()})();
//# sourceMappingURL=main.546c5c.bundle.js.map
可以看到打包代码中没有dateFormat()函数,但是处理的并不彻底,有相关的代码和注释。
上述的这种导入,有时是没有任何意义的,比如只是做import './format'导入,但是并没有使用任何的变量来接受dateFormat或者priceFormat。那么在打包时,应该全部移除,可以使用sideEffects进行此类优化。
在package.json中设置sideEffects的值:
true:默认值,会告知webpack所有模块都有副作用,那么就会保留所有模块的import导入;false:会告知webpack所有模块都没副作用,可以安全的删除未用到的模块import导入;注意,即使有副作用的模块也会被删掉。数组:配置为数组,会告知webpack哪些模块有副作用。元素支持glob格式,如
*.css,所有css后缀的模块都会保留如下配置,打包后的文件,会保留
format.js相关的导入代码;// package.json { "name": "19_learn_webpack", "sideEffects": [ "./src/format.js" ], // ... }
注:在开发中,尽量要写没有副作用的代码。以便打包能更好的进行优化。
开发中,如果模块都是无副作用的代码,那么就没必要配置到sideEffects数组中了。此时有副作用给就只剩下css相关模块,在package.json中配置sideEffects: ["**.css"]用来专门处理不删除css,这样处理也可以,但是显得有些大材小用。
{
  "name": "19_learn_webpack",
  "sideEffects": [
    "**.css"
  ],
  // ...
}
其实,Module的rules中也支持配置副作用属性Rule.sideEffects (opens new window),所以正确的做法是,在package.json中配置:
{
  "name": "19_learn_webpack",
  "sideEffects": false,
  // ...
}
在Webpack中配置如下:
module: {
  rules: [
    {
      test: /\.css/i,
      use: [
        MiniCssExtractPlugin.loader,
        'css-loader'
      ],
      sideEffects: true
    }
  ]
},
执行npm run build,可看到css可以正常打包,format.js也被忽略掉了。这也是React脚手架中的配置方案。
所以,在项目中对JavaScript的代码进行TreeShaking推荐方案是:
- 在optimization中配置usedExports为true,来帮助Terser进行优化;
- 在package.json中配置sideEffects,直接对模块进行优化;
# CSS实现TreeShaking
CSS的Tree Shaking需要借助于一些其他的插件:
- 在早期的时候,我们会使用PurifyCss插件来完成CSS的tree shaking,但是目前该库已经不再维护了。
- 目前可以使用PurgeCSS (opens new window)完成CSS的Tree Shaking,它是一个帮助我们删除未使用的CSS的工具;
安装PurgeCss的webpack插件purgecss-webpack-plugin (opens new window):
npm install purgecss-webpack-plugin -D
并配置Webpack的Plugin如下:
const path = require('path');
const { merge } = require('webpack-merge');
const baseConfig = require('./webpack.base');
const MiniCssExtractPlugin = require("mini-css-extract-plugin");
const TerserPlugin = require('terser-webpack-plugin');
const CssMinimizerPlugin = require("css-minimizer-webpack-plugin");
const PurgeCSSPlugin = require('purgecss-webpack-plugin');
const glob = require('glob');

module.exports = merge(baseConfig, {
  // mode: "production",
  mode: "development",
  devtool: 'source-map',
  module: {
    rules: [
      {
        test: /\.css/i,
        use: [
          MiniCssExtractPlugin.loader,
          'css-loader'
        ],
        sideEffects: true
      }
    ]
  },
  plugins: [
    // ...
    new PurgeCSSPlugin({
      // src下所有目录下的所有文件
      paths: glob.sync(path.resolve(__dirname, '../src/**/*'), {nodir: true}),
      safelist: function() {
        // 不移除html和body的样式
        return {
          standard: ['html', 'body']
        }
      }
    })
  ],
  optimization: {
    usedExports: true,
    minimize: true,
    minimizer: [
      new CssMinimizerPlugin()
    ]
  }
})
测试,有如下CSS代码style.css
html {
  font-size: 15px;
}

body {
  background: blue;
}

h2 {
  border: 1px solid black;
}

.container {
  color: red;
  font-size: 30px;
}
在mian.js中引入:
import { sum } from "./math.js";
import "./format"
import './style.css'

console.log(sum(2, 2))
执行npm run build后查看编译的CSS文件如下(已删除注释):
html{font-size:15px}body{background:blue}
可以看到没有使用到的h2和.container都被删除掉了。如果在main.js中添加如下代码:
import { sum } from "./math.js";
import "./format"
import './style.css'

console.log(sum(2, 2))

const titleDiv = document.createElement('div');
titleDiv.className = 'container';
titleDiv.innerHTML = '我是标题';
document.body.appendChild(titleDiv);
重新npm run build后:
html{font-size:15px}body{background:blue}.container{color:red;font-size:30px}
可看到只删除了没有使用到的h2。
注:purgecss也可以对less、sass文件进行处理,它本质是对打包后的css进行tree shaking操作。
# HTTP压缩
HTTP压缩是一种内置在服务器和客户端之间的,以改进传输速度和带宽利用率的方式;
HTTP压缩的流程如下:
HTTP数据在发送给服务器前就已经被压缩了;(可以在webpack中完成)
兼容的浏览器在向服务器发送请求时,会告知服务器自己支持哪些压缩格式;
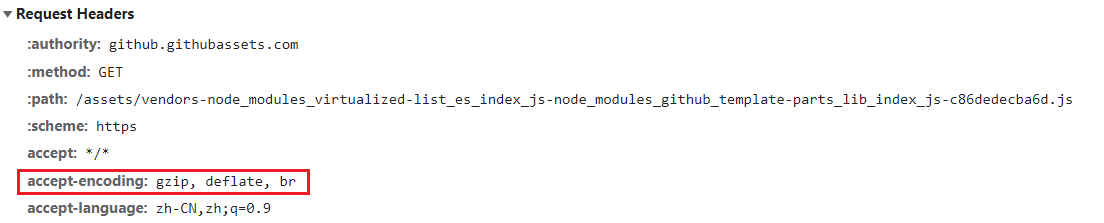
服务器在浏览器支持的压缩格式下,直接返回对应的压缩后的文件,并且在响应头中告知浏览器;
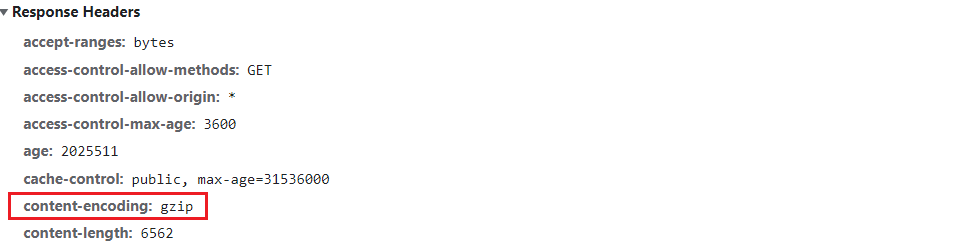
目前的压缩格式有:
compressUNIX的“compress”程序的方法(历史性原因,不推荐大多数应用使用,应该使用gzip或 deflate);deflate基于deflate算法(定义于RFC 1951)的压缩,使用zlib数据格式封装;gzipGNU zip格式(定义于RFC 1952),是目前使用比较广泛的压缩算法;br一种新的开源压缩算法,专为HTTP内容的编码而设计;
# Webpack对文件压缩
webpack中相当于是实现了HTTP压缩的第一步操作。
开发环境可以设置devServer.compress为true即可开启压缩。
生产环境中可以使用CompressionWebpackPlugin (opens new window)。
安装CompressionWebpackPlugin:
npm install compression-webpack-plugin -D
Webpack中配置CompressionPlugin:
const CompressionPlugin = require("compression-webpack-plugin");

module.exports = {
  plugins: [new CompressionPlugin()],
};
可以什么都不传,这样会都使用默认参数进行压缩。
我们配置如下:
const path = require('path');
const { merge } = require('webpack-merge');
const baseConfig = require('./webpack.base');
const CompressionPlugin = require('compression-webpack-plugin');

module.exports = merge(baseConfig, {
  mode: "production",
  plugins: [
   // ...
    new CompressionPlugin({
      test: /\.(css|js)$/, // 匹配压缩的文件
      threshold: 500, // 设置文件从多大开始压缩
      minRatio: 0.8, // 至少的压缩比例 达不到就不会压缩 优先于threshold
      algorithm: 'gzip', // 压缩算法
      // include:
      // exclude:
    })
  ],
  // ...
})
执行npm run build可以看到main.js被压缩成了main.42e51d.bundle.js.gz。
# HTML文件中代码压缩
这个用到之前使用过的插件HtmlWebpackPlugin (opens new window),之前用来生成HTML的模板,事实上它还有一些其他的配置:
inject:注入打包的资源插入的位置。可设置为true(默认值)、 false 、body、head
cache:设置为true(默认值),只有文件改变时,才会生成新文件
minify:默认会使用一个插件html-minifier-terser。开发环境值为false,不压缩。生产环境默认参数为:
{
  collapseWhitespace: true, // 折叠空格
  keepClosingSlash: true, // 保留单元素的尾部
  removeComments: true, // 移除注释
  removeRedundantAttributes: true, // 移除多余属性 如移除默认input的type=text属性
  removeScriptTypeAttributes: true,
  removeStyleLinkTypeAttributes: true, // 移除
  useShortDoctype: true
}
具体可设置的属性可查看文档 (opens new window)。
测试设置此插件属性如下:
new  plugins: [
  new HtmlWebpackPlugin({
    template: './src/index.html',
    inject: 'body',
    cache: true, // 文件未改变时,不重新生成文件
    // minify: false // 开发环境下,默认值
    minify: {
      removeComments: false, // 是否要移除注释
      removeRedundantAttributes: false, // 是否移除多余的属性 input的type=text默认会被移除
      removeEmptyAttributes: true, // 是否移除一些空属性 如 <div id=""></div> id属性会被移除
      collapseWhitespace: false, // 折叠(移除)空格
      removeStyleLinkTypeAttributes: true, // 比如link中的type="text/css"
      keepClosingSlash: true, // 是否保持单元素的尾部
      minifyCSS: true, // 是否压缩内部style标签中的CSS
      minifyJS: { // 是否压缩script标签中的JS代码 利用的是Terser插件
        mangle: {
          toplevel: true
        }
      }
    }
  })
]
模板文件index.html如下:
<!DOCTYPE html>
<html lang="en">
<head>
  <meta charset="UTF-8">
  <meta http-equiv="X-UA-Compatible" content="IE=edge">
  <meta name="viewport" content="width=device-width, initial-scale=1.0">
  <title>Document</title>
  <link rel="stylesheet" type="text/css" href="">

  <style>
    /* 压缩CSS */
    .title {
      color: red;
      font-size: 20px;
    }
  </style>
</head>
<body>
  <div id="app"></div>
  <div id="root"></div>
  <!-- 去掉默认type="text" 和 空属性id="" -->
  <input type="text" id="">
  <!-- 双标签变成单标签 -->
  <img></img>

  <!-- ejs中的if判断 -->
  <% if (process.env.NODE_ENV === 'production') { %>
  <script src="https://unpkg.com/dayjs@1.8.21/dayjs.min.js"></script>
  <script src="https://cdn.jsdelivr.net/npm/lodash@4.17.21/lodash.min.js"></script>
  <% } %>

  <script>
    // 压缩JS
    const message = "Hello World";
    console.log(message);
  </script>
</body>
</html>
执行构建后可看到模板文件如下:
<!DOCTYPE html>
<html lang="en">
<head>
  <meta charset="UTF-8">
  <meta http-equiv="X-UA-Compatible" content="IE=edge">
  <meta name="viewport" content="width=device-width,initial-scale=1">
  <title>Document</title>
  <link rel="stylesheet" href="">

  <style>.title{color:red;font-size:20px}</style>
<link href="css/main.8ed58c.css" rel="stylesheet"></head>
<body>
  <div id="app"></div>
  <div id="root"></div>

  <input type="text">

  <img>

  <script src="https://unpkg.com/dayjs@1.8.21/dayjs.min.js"></script>
  <script src="https://cdn.jsdelivr.net/npm/lodash@4.17.21/lodash.min.js"></script>

  <script>const o="Hello World";console.log(o)</script>
<script defer="defer" src="js/main.42e51d.bundle.js"></script></body>
</html>
对比可看到配置的属性处理已生效。
# InlineChunkHtmlPlugin
InlineChunkHtmlPlugin插件可以辅助将一些chunk出来的模块,内联到html中:
- 比如runtime的代码,代码量不大,但是是必须加载的;如果是一个单独的文件,那么就需要单独一次HTTP请求去获取一次
- 那么我们可以直接内联到html中,减少请求次数
这个插件是在react-dev-utils中实现的,所以我们可以安装一下它:
npm install react-dev-utils -D
在webpack中配置如下:
const HtmlWebpackPlugin = require('html-webpack-plugin');
const InlineChunkHtmlPlugin = require('react-dev-utils/InlineChunkHtmlPlugin');

module.exports = {
  plugins: [
    // ...
    new InlineChunkHtmlPlugin(HtmlWebpackPlugin, [/runtime.+\.js$/])
  ]
}
插件第一个参数需要传入HtmlWebpackPlugin插件,第二个参数传入要匹配到的插入模板文件的模块。
执行npm run build后可看到runtime.a4f4e2.bundle.js中的代码插入到了index.html中。
# 打包Library
webpack可以帮助我们打包自己的库文件,比如我们需要打包一个ccbean_utils的一个库。
那么使用这个库的开发者,可能在不同的环境,有些在Node、有些在浏览器中使用,我们在打包这个库时,就需要兼容各种使用环境。
可以通过配置output中的libraryTarget属性来处理。
比如我们如下配置:
const path = require('path');

module.exports = {
  mode: "development",
  entry: "./index.js",
  output: {
    path: path.resolve(__dirname, "./build"),
    filename: "ccbean_utils.js",
    // AMD/CommonJS/浏览器
    // CommnJoS: 社区规范的CommonJS, 这个里面是没有module对象
    // CommonJS2: Node实现的CommonJS, 这个里面是有module对象, module.exports
    libraryTarget: "umd",
    library: "ccbeanUtils", // 包的导出名 exports['ccbeanUtils'] 或 浏览器中 window['ccbeanUtils']
    globalObject: "this" // 全局对象的值 umd格式的兼容函数的第一个参数
  }
}
上面的配置:
- library (opens new window)设置库的导出名为ccbeanUtils来暴露库,使用该库时候可以通过
ccbeanUtils.xxx访问库中的属性和方法 libraryTarget为umd,打包代码就支持UMD开发规范,适配多个环境globalObject设置的是全局对象的引用值
设置libraryTarget为umd,打包代码就支持UMD开发规范,生成代码如下,省略了传入的factory函数中的内容:
(function webpackUniversalModuleDefinition(root, factory) {
	if(typeof exports === 'object' && typeof module === 'object')
		// Node的CommonJS环境
		module.exports = factory();
	else if(typeof define === 'function' && define.amd)
		// AMD环境
		define([], factory);
	else if(typeof exports === 'object')
		// Pure CommonJS环境(社区CommonJS	)
		exports["ccbeanUtils"] = factory(); // ccbeanUtils就是library设置的值
	else
		// 浏览器环境
		root["ccbeanUtils"] = factory(); // ccbeanUtils就是library设置的值
})(this, () => { // 传入的参数this就是globalObject设置的值
  // ...
});
可以看到,这个库就可以适配多种开发环境。
不过我们一般不使用Webpack来做库开发,而是使用Rollup。