 Redux原理学习
# Redux的设计思想
Reudx的设计思想:
- Web应用是一个状态机,视图与状态是一一对应的
- 所有的状态,保存在一个对象里面
Redux的工作流程
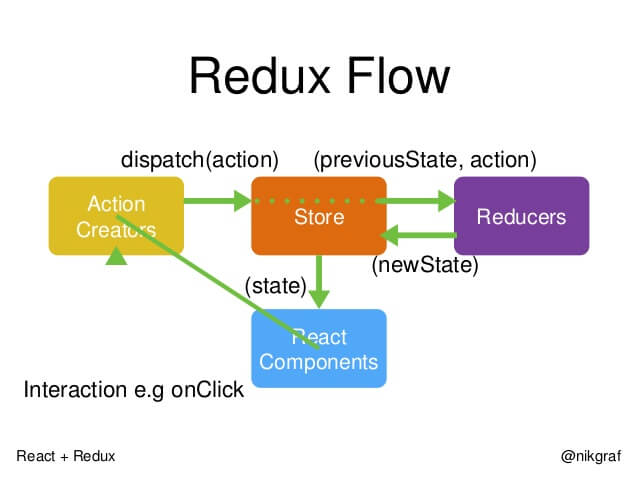
Store保存数据的地方,可以看作成一个容器。整个应用有一个StoreStateStore包含所有的数据。State是某个时点的数据集合。- 当前时刻点的State,可以通过
store.getState()拿到 - Redux 规定,一个State对应一个View。
- 只要 State 相同,View 就相同。你知道 State,就知道 View 是什么样,反之亦然。
- 当前时刻点的State,可以通过
ActionState 的变化,会导致 View 的变化。- 但是,用户接触不到 State,只能接触到 View。
- 所以,State 的变化必须是 View 导致的。
- Action 就是 View 发出的通知,表示 State 应该要发生变化了。
- 然后View在State变化之后,也会跟着发生变化。
Action Creator生成Action的函数。store.dispatch发出Action的唯一方法。ReducerStore 收到 Action 以后,必须给出一个新的 State,这样 View 才会发生变化。这种 State 的计算过程就叫做 Reducer。- Reducer 是一个函数,它接受 Action 和当前 State 作为参数,返回一个新的 State
store.subscribeStore 允许使用store.subscribe方法设置监听函数,一旦 State 发生变化,就自动执行这个函数。
# redux简化实现
redux主要对外暴露5个我们常用的方法,下面是简化实现。
# createStore
Store可看作是一个容器,容器中包括:
- 所有的数据和操作数据的一些方法
- 获取state -> getState
- 发送action -> dispatch
- 监听action -> subscribe
{
  dispatch,
  subscribe,
  getState
}
createStore方法如下
function createStore(reducer, enhancer) {
  // 执行中间件
  if (enhancer) {
    return enhancer(createStore)(reducer);
  }

  let currentState = {};
  let currentListeners = [];

  const getState = () => currentState;
  const subscribe = (listener) => {
    currentListeners.push(listener);
    // unsubscribe
    return () => currentListeners = [];
  }
  const dispatch = (action) => {
    // store在dispatch时调用reducer
    currentState = reducer(currentState, action);
    // 执行所有的订阅监听
    for (const listener of currentListeners) {
      listener();
    }

    return action;
  }

  dispatch({ type:'@@INIT_REDUX' });

  const store = {
    getState,
    subscribe,
    dispatch
  };

  return store;
}
如果又enchancer函数,那么就先执行enhancer函数,然后在enhancer中再次调用createStore;
- 这里的enhancer其实是applyMidderware方法的返回函数
(createStore) => (reducer) => {...}
- 这里的enhancer其实是applyMidderware方法的返回函数
接下来声明
getState、subscribe、dispatch方法:- getState 获取Store中的state
- subscribe 注册Store的订阅函数
- dispatch 方法会自动调用reducer方法,计算得到新的state;同时触发订阅的currentListeners中的订阅方法
dispatch({ type:'@@INIT_REDUX' });首先调用下diapatch方法,目的是为了在初始化的时候getState就能获取到值。这样就可以获取初始化的initailState暴露
{ getState, dispatch, subscribe }方法给外部。
# compose
applyMiddleware方法的内部会调用compose方法,compose是redux中间件实现的核心。
function compose(...funcs) {
  if (funcs.length === 0) {
    return funcs => funcs;
  }

  if (funcs.length === 1) {
    return funcs[0];
  }

  return funcs.reduce((a, b) => {
    return (...args) => {
      return a(b(...args));
    }
  })
}
使用compose
const test1 = (next) => {
  console.log('test1')
  return (data) => {
    console.log('1')
    return next(data)
  }
}

const test2 = (next) => {
  console.log('test2')
  return (data) => {
    console.log('2')
    return next(data)
  }
}

const test3 = (next) => {
  console.log('test3')
  return (data) => {
    console.log('3')
    return next(data)
  }
}

const test4 = (next) => {
  console.log('test4')
  return (data) => {
    console.log('4')
    next(data)
  }
}

// test1(test2(test3(test4())))
const composeFunc = compose(test1, test2, test3, test4);

const chain = composeFunc(() => { console.log('hello world', data) });

// 调用
chain({ data: 'data' });

// 输出
// test4
// test3
// test2
// test1
// 1
// 2
// 3
// 4
// hello world
使用compose处理test1\2\3\4后,会形成
test1(test2(test3(test4())))调用形成的
test1(test2(test3(test4())))即composeFunc(() => { console.log('hello world') });,这里传入我们需要增强的函数,然后由内向外调用,此时会形成一个函数链,即闭包函数。这次调用的输出为:test4 test3 test2 test1然后调用形成的函数链,
chain({ data: 'data' }),这次调用的输出为1 2 3 4 hello world { data: 'data' }这里的chain形成的格式如下
// 形成发chain如下
const manulChain = () => {
  console.log('1');
  return (() => { // test1的next
    console.log('2');
    return (() => { // test2的next
      console.log('3');
      return (() => { // test3的next
        console.log('4');
        return (() => { // test4的next 即 要增强的函数
          console.log('hello world~~~')
        })()
      })()
    })()
  })()
}

// 调用增强后的函数
manulChain();

// 输出
// 1
// 2
// 3
// 4
// hello world~~~
这里的中间件类似于Koa中的中间件,只不过Koa中的中间件执行顺序是由上到下,再由下到上;而redux中是由下到上,再由上到下,正好反过来。
# applyMiddleware
function applyMiddleware(...middlewares) {
  return (createStore) => (reducer) => {
    const store = createStore(reducer);

    const middlewareAPI = {
      getState: store.getState,
      dispatch: (action, ...args) => store.dispatch(action, ...args)
    };

    const chain = middlewares.map(middleware => middleware(middlewareAPI));
    const dispatch = compose(...chain)(store.dispatch);
    return {
      ...store,
      dispatch
    };
  }
}
- 当我们调用
applyMiddleware()后,会返回一个enhancer函数,并传递给createStore(...)方法 - createStore方法会调用enhancer方法
- 首先对中间件进行一层包裹,使得中间件中可以使用
getState、dispatch方法 - 然后调用compose方法执行中间件,并会返回一个函数链,该函数链的末端就是
store.disaptch方法。也就是说对disaptch方法进行了增强,加入了中间件。 - 最后返回包含增强disaptch的store,给开发者使用。
# bindActionCreators
function bindActionCreator(creater, dispatch) {
  return (...args) => {
    return dispatch(creater(...args));
  }
}

function bindActionCreators(actionCreators, dispatch) {
  const boundActionCreators = {};

  for (const key in actionCreators) {
    boundActionCreators[key] = bindActionCreator(actionCreators[key], dispatch);
  }
  return boundActionCreators;
}
作用是对action creator函数进行封装。
生成一个value是actionCreator的对象,
使用Redux中调用store.dispatch(doSomethingAction())、store.dispatch(doSomethingAction2()),在使用测函数bindActionCreators()包裹后会生成如下对象
bindActionCreators({ doSomethingAction, doSomethingAction2 })
// 生成
{
  doSomethingAction: (...args) => store.dispatch(doSomethingAction(...args)),
  doSomethingAction2: (...args) => store.dispatch(doSomethingAction2(...args))
}
简化业务开发时模板代码,详见connect中的使用。
# combineReducers
function combineReducers(reducers) {
  const reducerKeys = Object.keys(reducers);
  const finalReducers = reducers;

  let hasChanged = false;
  const nextState = {};

  return function combination(state, action) {
    for (let i = 0; i < reducerKeys.length; i++) {
      const key = reducerKeys[i];
      const reducer = finalReducers[key];
      const previousStateForKey = state[key];
      const nextStateForKey = reducer(previousStateForKey, action);

      nextState[key] = nextStateForKey;
      hasChanged = hasChanged || nextStateForKey !== previousStateForKey;
    }

    hasChanged = hasChanged || reducerKeys.length !== Object.keys(state).length;

    return hasChanged ? nextState : state;
  }
}
调用reducer时,内部执行所有分片的reducer,然后返回一个最新的state。
# 使用自己的redux
const { createStore, combineReducers, applyMiddleware } = require('./src/lib/redux');

const initialState = { counter: 0, hello: 'hello' };
const counterReducer = (state = initialState, action) => {
  switch (action.type) {
    case 'INCREMENT':
      return { ...state, counter: state.counter + 1 };
    case 'DECREMENT':
      return {...state, counter: state.counter - 1};
    default:
      return state;
  }
}

const combineReducer = combineReducers({
  counterReducer
});

// applyMiddleWare
const loggerMiddleware = (middlewareApi) => {
  // 第一层
  console.log('getLogMiddleware')
  return (next) => {
    // 第二层
    console.log('logger init')
    return (action) => {
      // 第三层
      next(action);
    }
  }
}


const thunkMiddleware  = ({dispatch,getState}) => {
  console.log('thunkMiddleware')
  return next => {
    console.log('thunk init')
    return action => {
      if(typeof action === 'function'){
        return action(dispatch, getState);
      }
      return next(action);
    }
  }
}
const enchancer = applyMiddleware(loggerMiddleware, thunkMiddleware);
const store = createStore(combineReducer, enchancer);

store.subscribe(() => {
  console.log('获取值', store.getState());
});

store.dispatch({ type: "INCREMENT" });

store.dispatch((dispatch, getstate) => {
  return setTimeout(() => {
    dispatch({ type: "INCREMENT" });
  }, 2000);
});

// 输出
// getLogMiddleware
// thunkMiddleware
// thunk init
// logger init
// 获取值 { counterReducer: { counter: 1, hello: 'hello' } }
// 获取值 { counterReducer: { counter: 2, hello: 'hello' } }
- applyMiddleware()中调用compose()时,执行第一层,输出getLogMiddleware和thunkMiddleware
- compose()会返回一个函数composeFunc,再调用composeFunc()函数,执行第二层,返回一个增强的dispatch函数,输出thunkinit和loggerinit
- 执行store.dispatch函数,执行第三层,输出订阅结果的获取值。
# react-redux的简化实现
# 实现全局context
import React from 'react';
import { bindActionCreators } from './redux';

const StoreContext = React.createContext();
react-redux中的Provider内部其实是对React.createContext()做了封装。
# 实现connect
import React from 'react';
import { bindActionCreators } from './redux';

const StoreContext = React.createContext();

function connect(mapStateToProps, mapDispatchToProps) {
  return function enhanceHOC(WrapComponent) {
    class EnhanceComponent extends React.PureComponent {
      constructor(props, context) {
        super(props);
        this.state = {
          props: {}
        }
      }

      componentDidMount() {
        this.unsubscribe = this.context.subscribe(() => {
          this.update();
        })

        this.update();
      }

      componentWillUnmount() {
        this.unsubscribe();
      }

      update() {
        const stateProps = mapStateToProps(this.context.getState());
        let dispatchProps = null;
        if (typeof mapDispatchToProps === 'function') {
          dispatchProps = mapDispatchToProps(this.context.dispatch)
        } else {
          dispatchProps = bindActionCreators(mapDispatchToProps, this.context.dispatch);
        }

        this.setState({
          props: {
            ...this.state.props,
            ...stateProps,
            ...dispatchProps
          }
        });
      }

      render() {
        return <WrapComponent
          {...this.props}
          {...this.state.props}
        />
      }
    }

    EnhanceComponent.contextType = StoreContext;

    return EnhanceComponent;
  }
}

export {
  StoreContext,
  connect
};
挂载完毕后,执行
this.update(),挂载store中的state和dispatch到组件中。同时监听state的变化进行this.update()卸载组件时,取消订阅。
update方法
执行mapStateToProps方法,挂载这些state到组件中
执行mapDispatchToProps方法,挂载dispatch到组件中
这里如果mapDispatchToProps传入了一个对象,使用bindActionCreators方法
export default connect(
  state => ({
    counter: state.counterInfo.counter,
  }),
  {
    increAction
    increActionAsync
    decreAction,
    subAction
  }
)(Home);
那么这一部分会被包裹处理为
 {
    increAction: (...args) => store.dispatch(increAction(...args))
    increActionAsync: (...args) => store.dispatch(increActionAsync(...args))
    decreAction: (...args) => store.dispatch(decreAction(...args)),
    subAction: (...args) => store.dispatch(subAction(...args))
  }
如果组件中的方法名和action中的方法名相同,就可以省去我们写这些模板代码。
# 使用react-redux
app.js
import { StoreContext } from './lib/react-redux';
import store from './store';
import Counter from './pages/counter';

function App() {
  return (
    <StoreContext.Provider value={store}>
      <Counter/>
    </StoreContext.Provider>
  );
}

export default App;
counter.js
import React, { PureComponent } from 'react';
import { subAction, decreAction, increAction, increActionAsync } from '../store/counter/actionCreators';
import { connect } from '../lib/react-redux';

class Home extends PureComponent {

  render() {
    return (
      <div>
        <h1>Counter</h1>
        <h2>计数:{this.props.counter}</h2>
        <button onClick={e => this.increment()}>+1</button>
        <button onClick={e => this.incrementAsync()}>Async +1</button>
        <button onClick={e => this.decrement()}>-1</button>
        <button onClick={e => this.subNumber()}>-5</button>
      </div>
    )
  }

  increment() {
    this.props.increAction();
  }

  incrementAsync() {
    this.props.increActionAsync();
  }

  decrement() {
    this.props.decreAction();
  }

  subNumber() {
    this.props.subAction(5);
  }
}

export default connect(
  state => ({
    counter: state.counterInfo.counter,
    banners: state.homeInfo.banners,
    recommends: state.homeInfo.recommends
  }),
  // {
  //   increAction
  //   increActionAsync
  //   decreAction,
  //   subAction
  // }
  dispatch => ({
    increAction() {
      dispatch(increAction());
    },
    increActionAsync () {
      dispatch(increActionAsync());
    },
    decreAction() {
      dispatch(decreAction());
    },
    subAction(num) {
      dispatch(subAction(num));
    }
  })
)(Home);
项目完整的代码在github (opens new window)
参考:
- http://www.ruanyifeng.com/blog/2016/09/redux_tutorial_part_one_basic_usages.html
- https://www.ruanyifeng.com/blog/2016/09/redux_tutorial_part_two_async_operations.html
- https://www.ruanyifeng.com/blog/2016/09/redux_tutorial_part_three_react-redux.html